Group work and Collaborators
This concept was developed during the seventh Social Robot Design session as part of Group 1. The aim of the session was to develop one of our earlier design directions into a functional, physical design tool that could be tested with the actual robot concept. We chose to focus on scenario and behaviour design because our case depends strongly on safe, situated dog–robot interaction. The tool had to help us move beyond general ideas such as "the robot calms the dog" and instead make interaction moments, edge cases, failure points, and safety risks visible before testing with real animals.
Collaborators:
Maurits Dijkman, Bianca Filip, Ewoud Janus, Emilia Pavel, and Gijs Vis.
My contribution:
My contribution focused on connecting the toolkit to our earlier portfolio work on story building, expressiveness, embodiment, and behaviour. I helped translate the pet anxiety case into scenario cards, robot state cards, and dog actor cards. I also contributed to the reflection on how the cards reveal safety risks for Alan, such as approaching too quickly, dispensing treats too close to the robot, misreading fear as calmness, or failing to respect the dog's personal space.
1. Motivated direction choice
For the in-depth group assignment, we chose the direction of scenario design and behaviour prototyping. Our final tool is the Pet Anxiety Toolkit, a card-based scenario tool for simulating interactions between Alan and dogs.
We chose this direction because our case is not mainly a problem of appearance or isolated motion anymore. In earlier sessions, we already made progress on embodiment, expression, and behaviour. We decided that the next important problem was to test how these elements work together in a realistic interaction sequence.
Our case involves an anxious dog in a domestic environment. This is a vulnerable situation because the dog cannot verbally explain discomfort, consent to interaction, or tell us when the robot is making things worse. Therefore, the most important design challenge is not simply to make Alan interactive, but to make Alan safe, restrained, and responsive to edge cases.
The Pet Anxiety Toolkit builds on several earlier course directions. From story building, it keeps the idea that scenarios can reveal design requirements. However, our earlier scenarios were mostly written stories. The toolkit turns scenarios into acted interactions. From expressiveness, it uses the insight that movement quality matters: direct, fast, or pushy movement can be threatening for an anxious animal. From embodiment, it keeps Alan as the selected prototype base, while testing whether its physical features and attachments make sense in interaction. From behaviour design, it builds on the Sense-Think-Act logic by asking what Alan senses, how the situation is interpreted, what Alan does, and what can go wrong.
The SRD methods landscape also supported this direction because it shows scenario tools, bodystorming, theatre-based prototyping, Wizard of Oz, and card-based methods as relevant ways to make social robot interactions testable before full implementation.
The gap in the previous tools was that none of them forced us to combine scenario, dog behaviour, robot failure, proxemics, physical props, and hardware constraints in one testable format. The Pet Anxiety Toolkit was designed to fill that gap.
2. Tool overview
The Pet Anxiety Toolkit is a card-based bodystorming and simulation tool. It helps designers safely explore possible interactions between Alan and dogs before testing with real animals.
The toolkit uses three card decks. The first deck is the Scenario and Context deck. These cards define the setting, the goal of the interaction, and any required props. Examples include getting familiar, routine feeding, active play, navigation, and emergency situations.
The second deck is the Robot State deck. These cards define how Alan behaves during the scenario. Some states describe good behaviour, such as smooth and predictable movement. Other states deliberately introduce failure or risk, such as pushy movement, lag, low battery, or too many treats.
The third deck is the Dog Actor deck. These cards define the dog's temperament and edge-case trigger. Examples include anxious, assertive, destructive, scared, and optimal/calm behaviour.
The toolkit manual describes the same three-deck structure and explains that the tool is meant to identify edge cases, logic failures, and safety hazards before live animal testing. The final poster summarises the toolkit as "PAT in one box": three card decks, props, panels, a manual, and Alan as the robot.
The basic procedure is simple: draw one card from each deck, assign roles, act out the situation, observe where the interaction breaks down, and then use the result to improve Alan's behaviour and hardware requirements.
3. Conceptualisation and Physicalisation
The first phase was conceptualisation. We started by defining the structure of the toolkit: the goal, the card decks, the roles, the setup, the execution steps, the observation questions, and the iteration loop.
Figures 1, 2, and 3 show the manual for the Pet Anxiety Toolkit. The manual explains the goal of the tool, the three card decks, the required roles, the setup preparation, the execution steps, the observation questions, and the iteration loop. This figure is the conceptualisation of the tool because it shows how the toolkit was designed before and during testing.
The manual defines three roles: Robot Proxy, Dog Proxy, and Observer/Recorder. This role division is important because the tool not only asks what Alan should do. It also asks how the dog might react and how an observer should document the interaction.
The second phase was physicalisation. We turned the tool idea into actual printed scenario cards. The first version already contained scenario cards, robot behaviour cards, and dog behaviour cards, but it was still relatively compact and difficult to read quickly during acting.
Figures 4 through 15 show the first physical version of the scenario cards, with Figures 16 and 17 showing the physical versions. This version already included different scenario, robot, and dog cards, but the visual hierarchy was less clear. During review, this made it harder to quickly recognise which cards represented contexts, which represented robot states, and which represented dog behaviours.
After this first version, the card set was redesigned. The second version made the categories clearer and easier to act out. The cards became more visually distinct, and the content became more directly usable during a walkthrough. The second version includes scenario/context cards such as Getting Familiar, Routine Feeding, Active Play, Navigation, and Emergency; robot cards such as Pushy Movement, Low Battery, Too Many Treats, Optimal/Perfect, and Lag; and dog cards such as Optimal/Perfect, Anxious, Alpha/Assertive, Destructive, and Scared.
Figures 18 through 32 show the second version of the scenario cards. This version is the resulting redesign of the toolkit. The scenario cards clearly separate setting, goal, and prop. The robot cards clearly separate movement and interaction. The dog cards clearly separate the main action and edge-case trigger. This made the tool more usable for roleplay and more specific for identifying interaction failures.
The final communication phase was the poster and video. These were not only presentation outputs; they also show the final form of the tool and how it is meant to be understood by someone outside the group.
The poster explains the core problem: anxious home-alone dogs may whine, cry, or become aggressive, and testing unclear robot behaviour directly with a real dog is risky. The poster presents PAT as a toolkit with three card decks, props, side panels, a manual, and Alan, designed to expose robot–dog failure points through acting without putting a real animal at risk.
The movie demonstrates how the toolkit is used. We introduced the problem, explained why live animal testing is risky, demonstrated two example scenarios, and then reflected on issues found during testing and iteration.
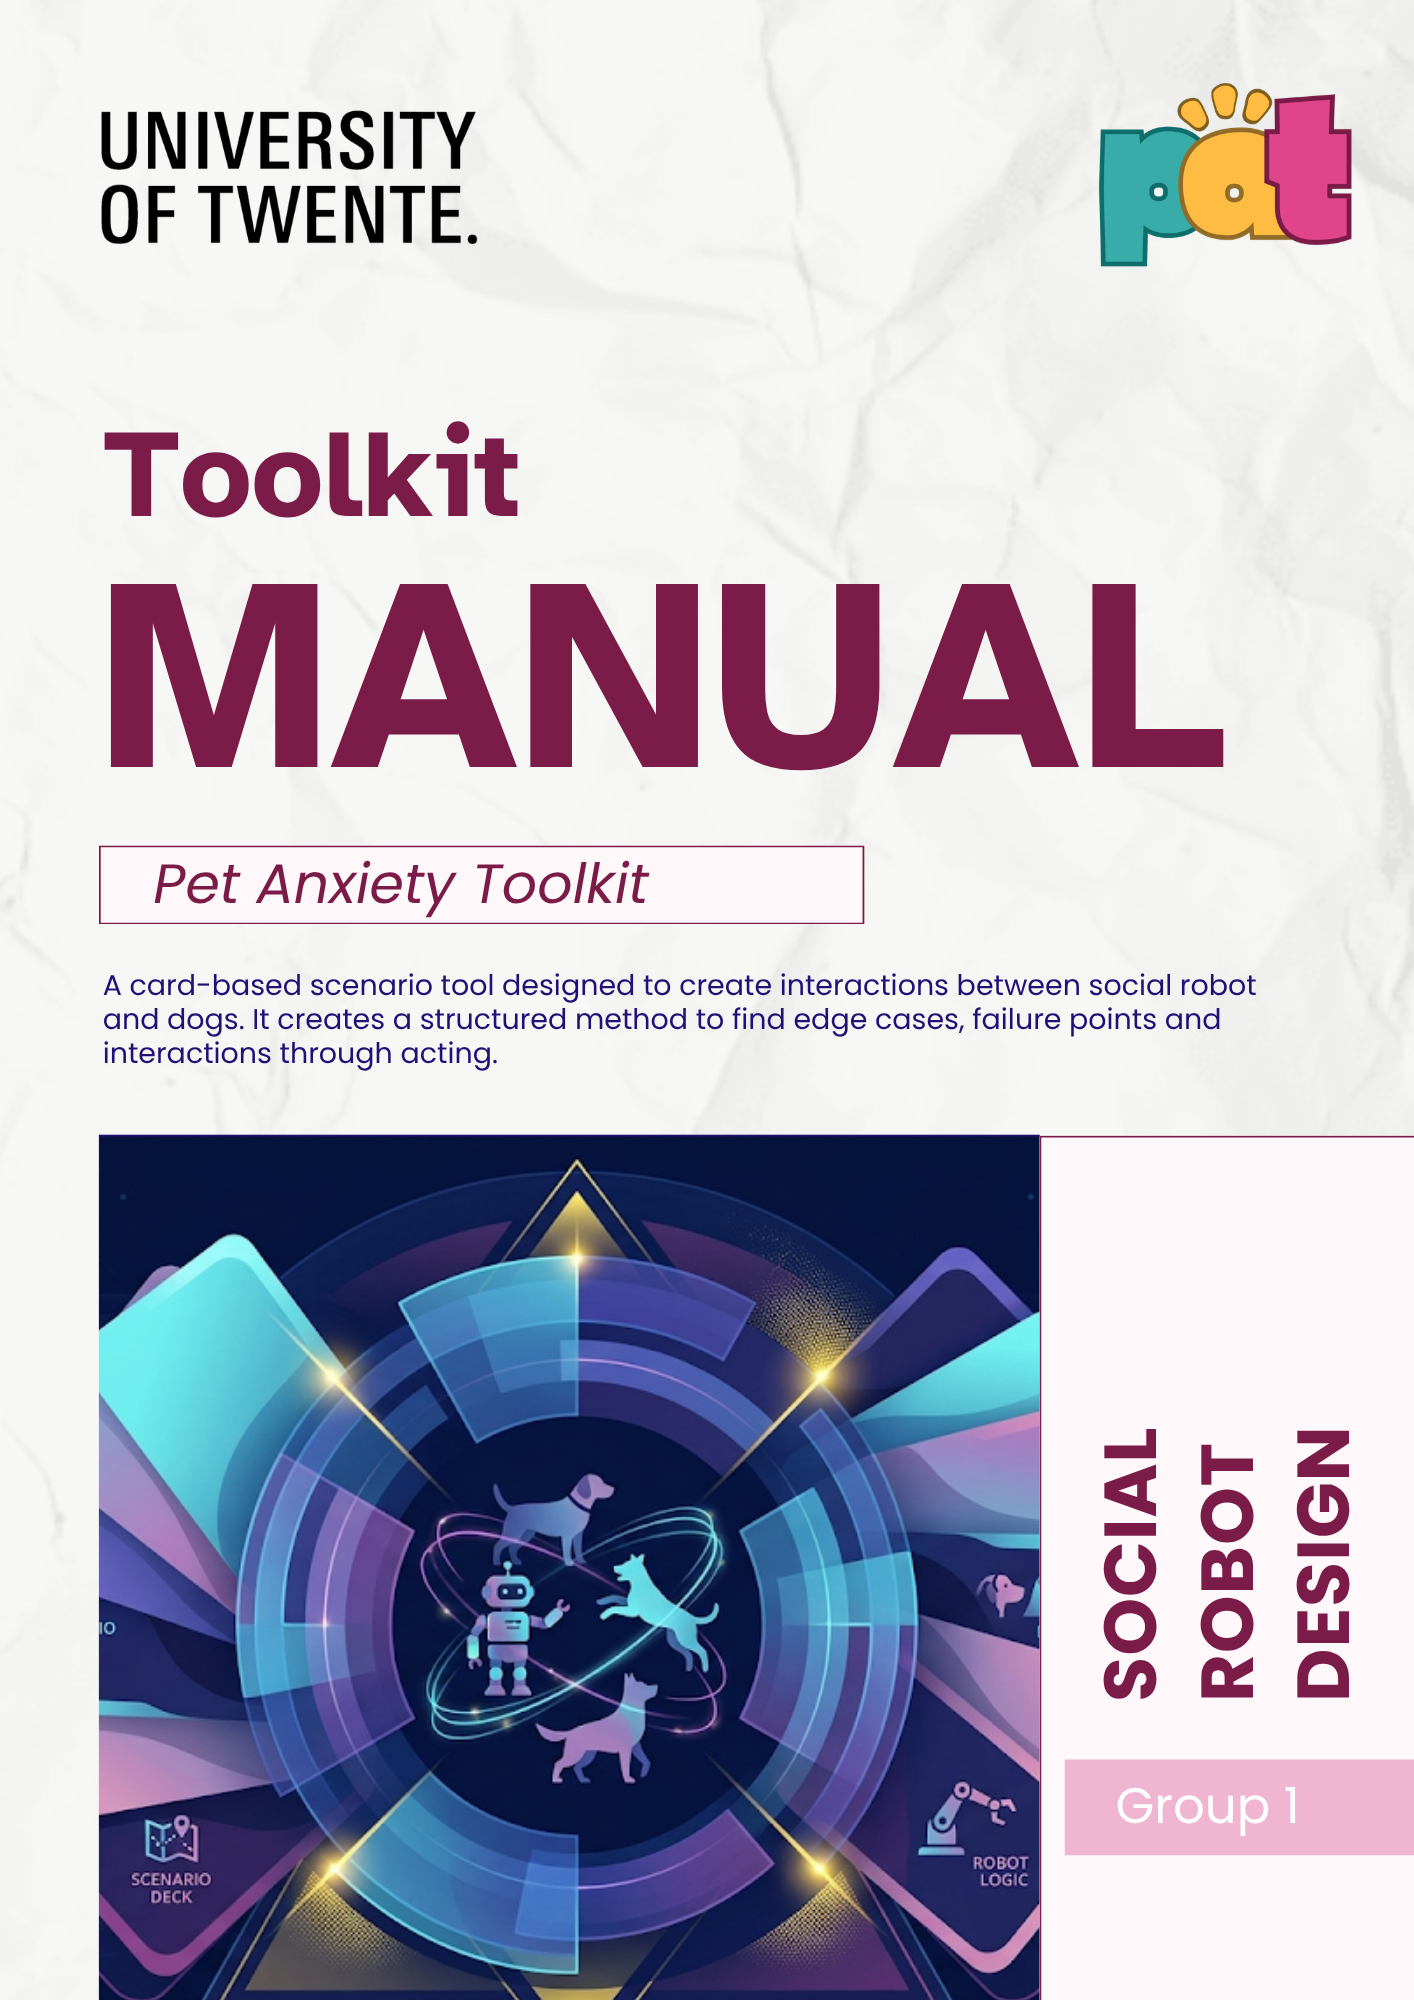
Figure 1. Conceptualisation - Pet Anxiety Toolkit manual and workflow, page 1.
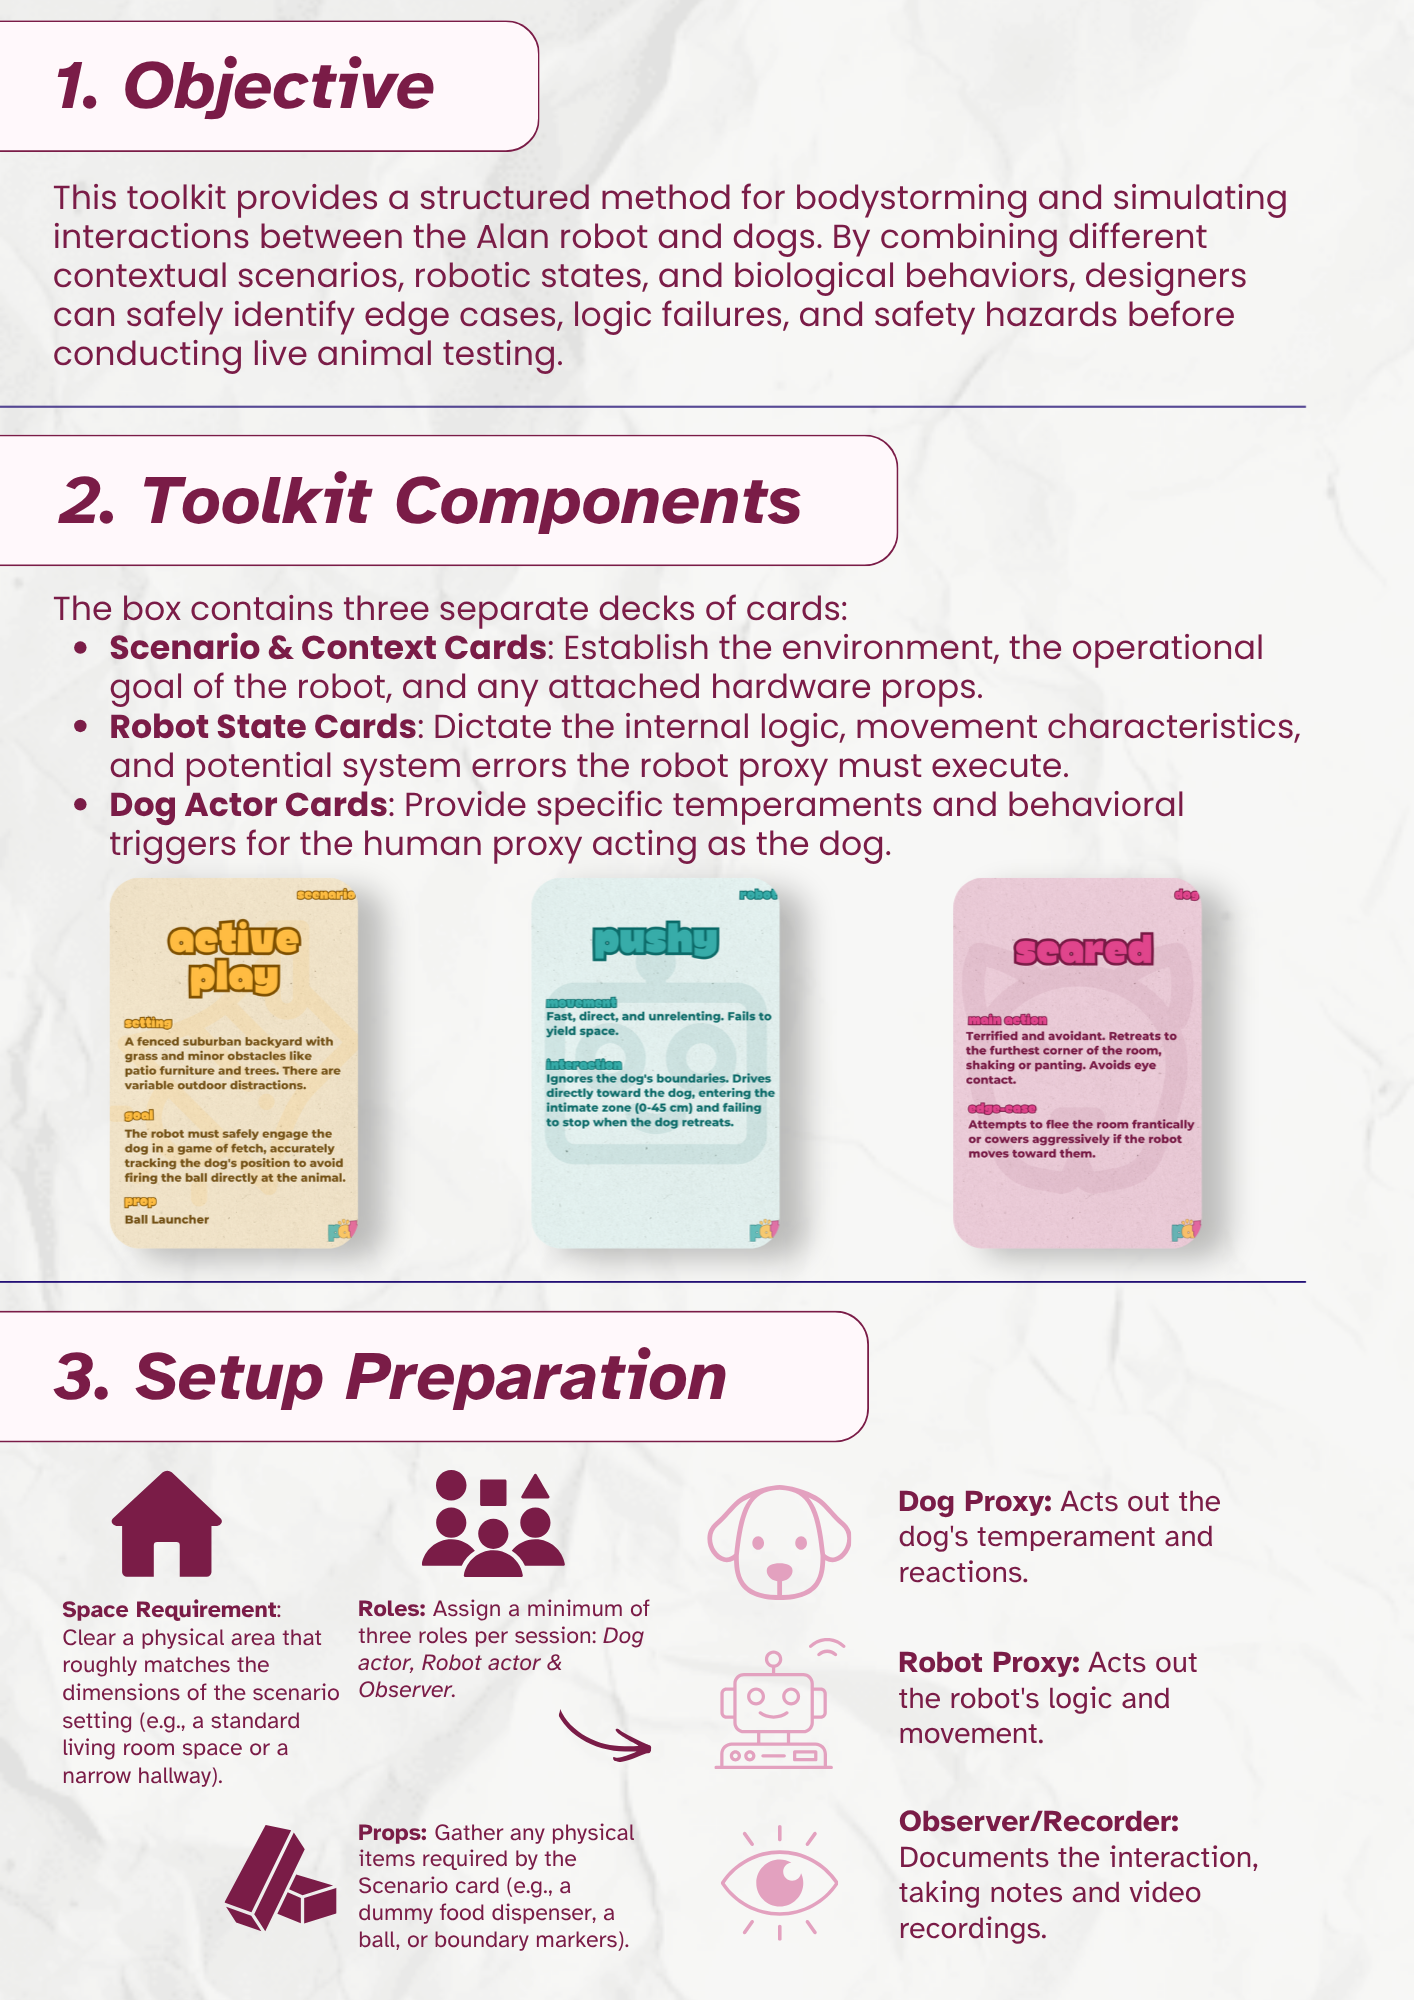
Figure 2. Conceptualisation - Pet Anxiety Toolkit manual and workflow, page 2.
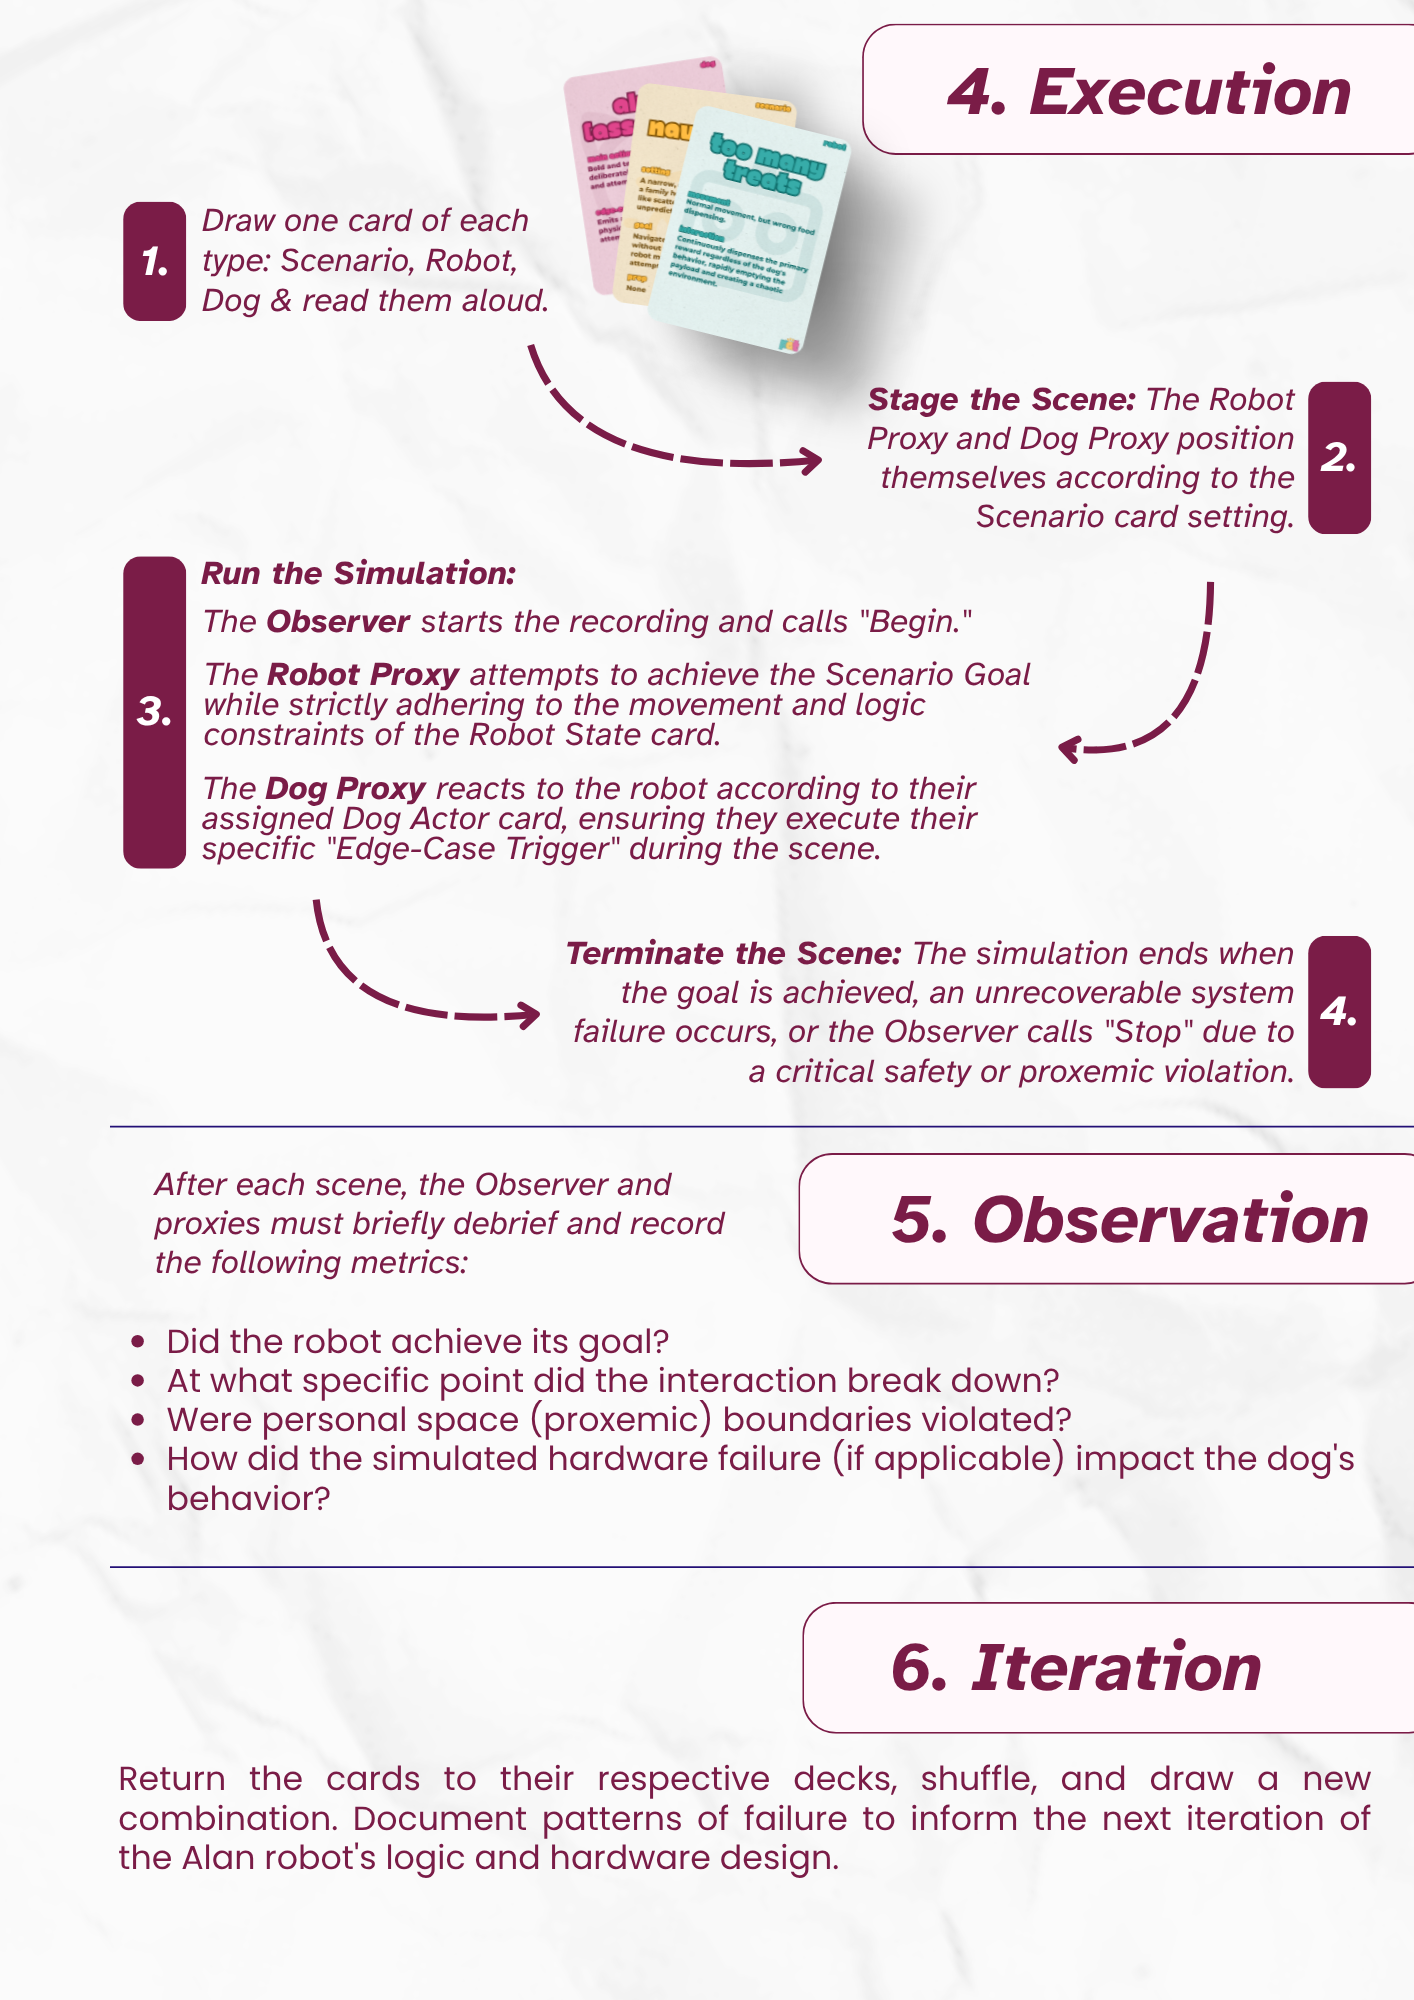
Figure 3. Conceptualisation - Pet Anxiety Toolkit manual and workflow, page 3.
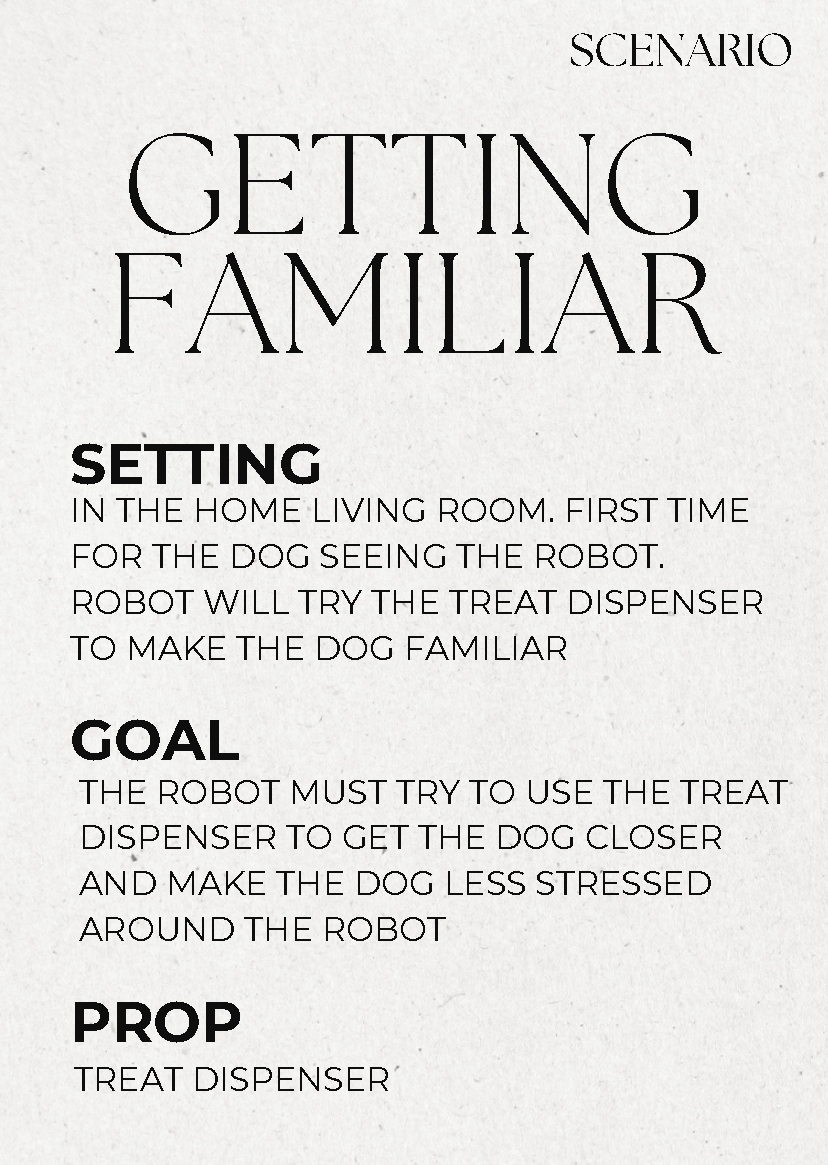
Figure 4. Physicalisation - First version of the scenario cards, scenario 1.
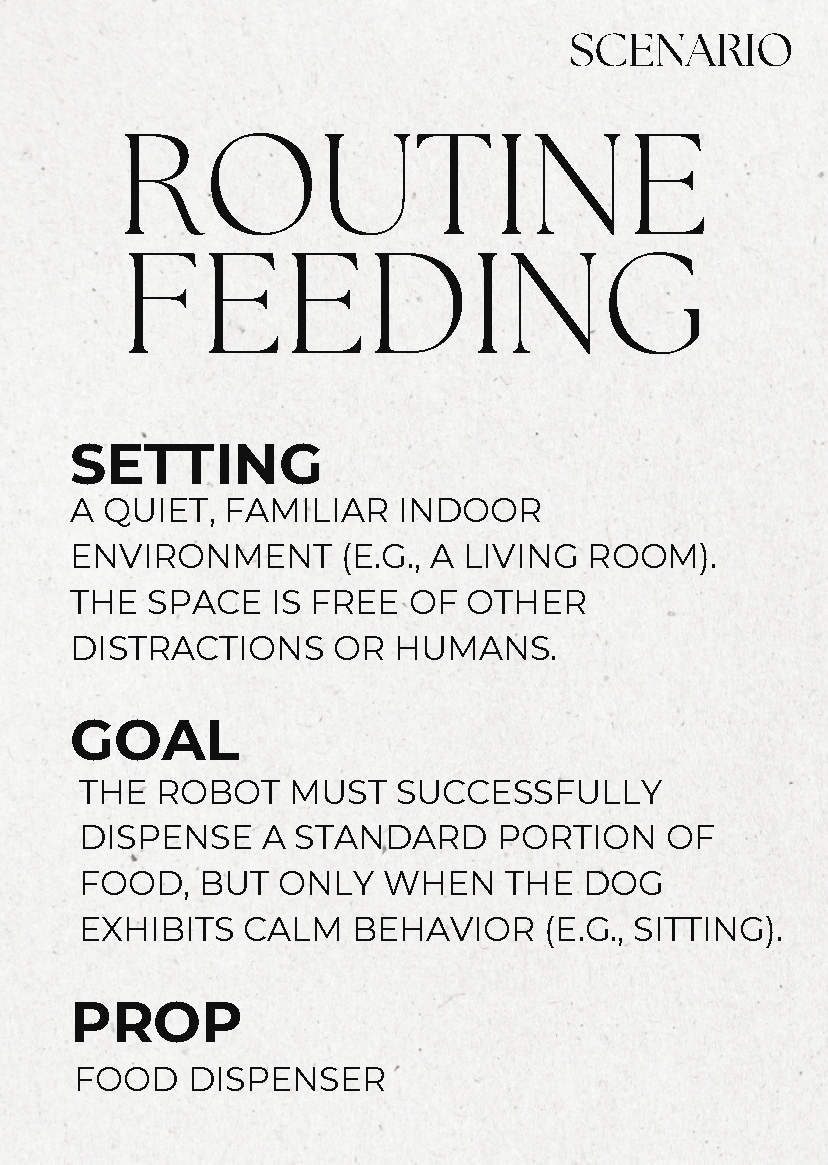
Figure 5. Physicalisation - First version of the scenario cards, scenario 2.
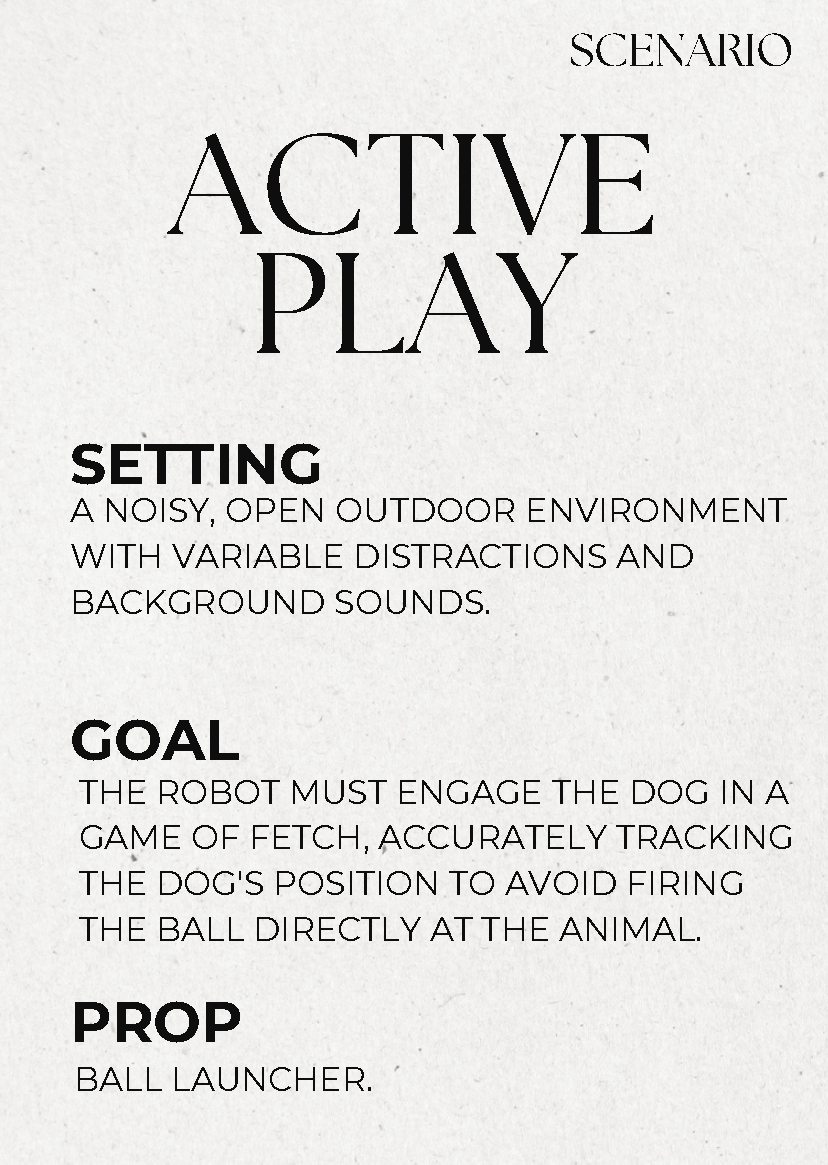
Figure 6. Physicalisation - First version of the scenario cards, scenario 3.
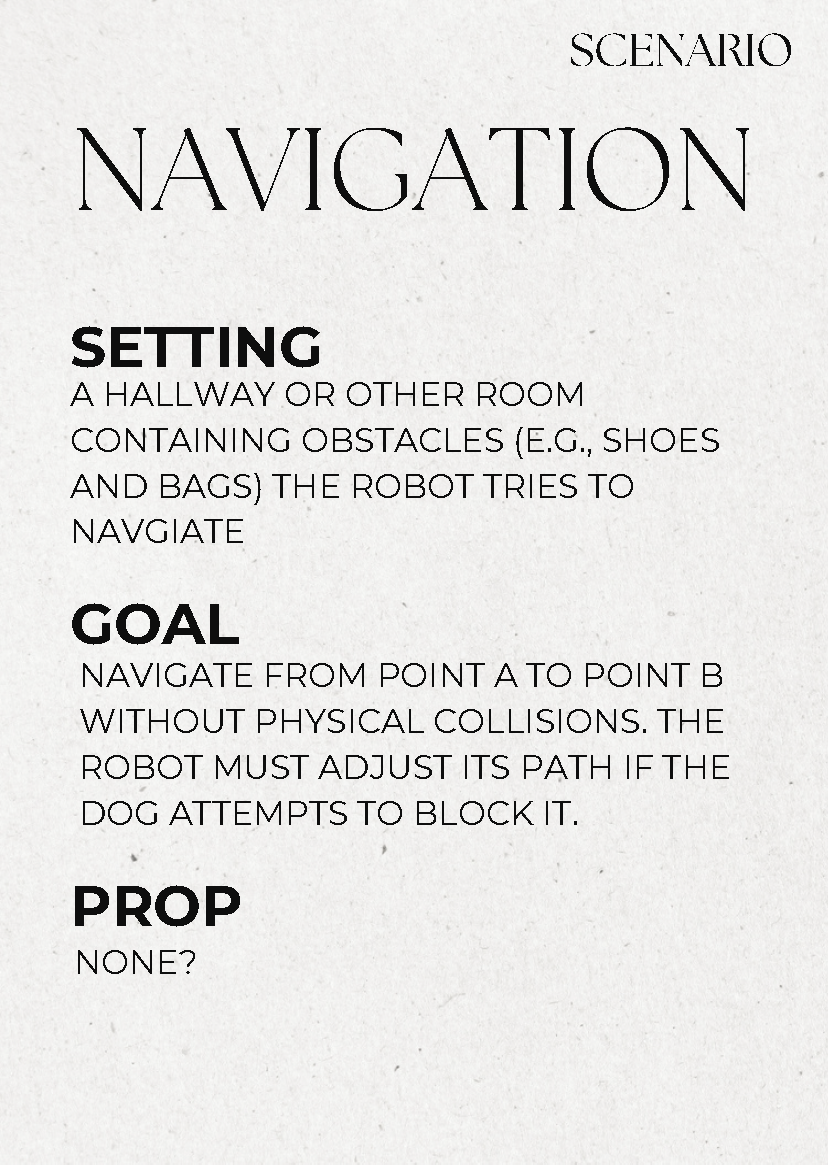
Figure 7. Physicalisation - First version of the scenario cards, scenario 4.
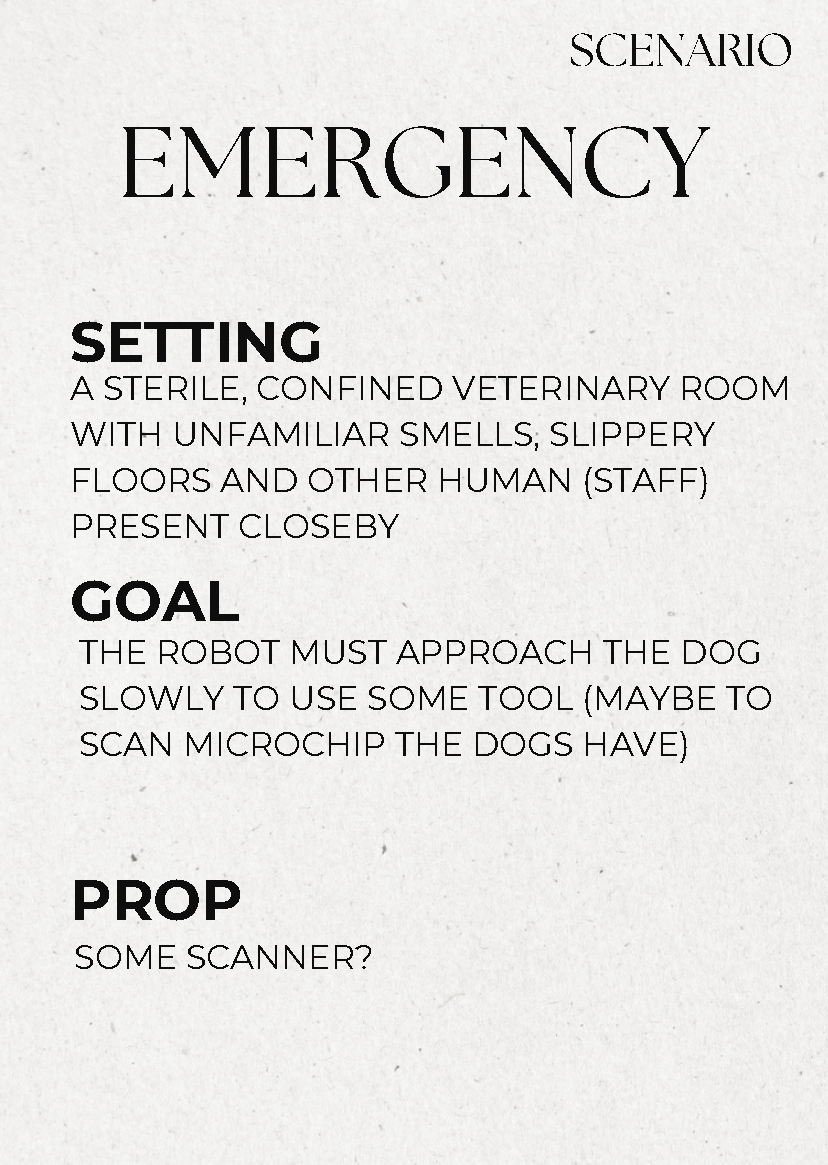
Figure 8. Physicalisation - First version of the scenario cards, scenario 5.
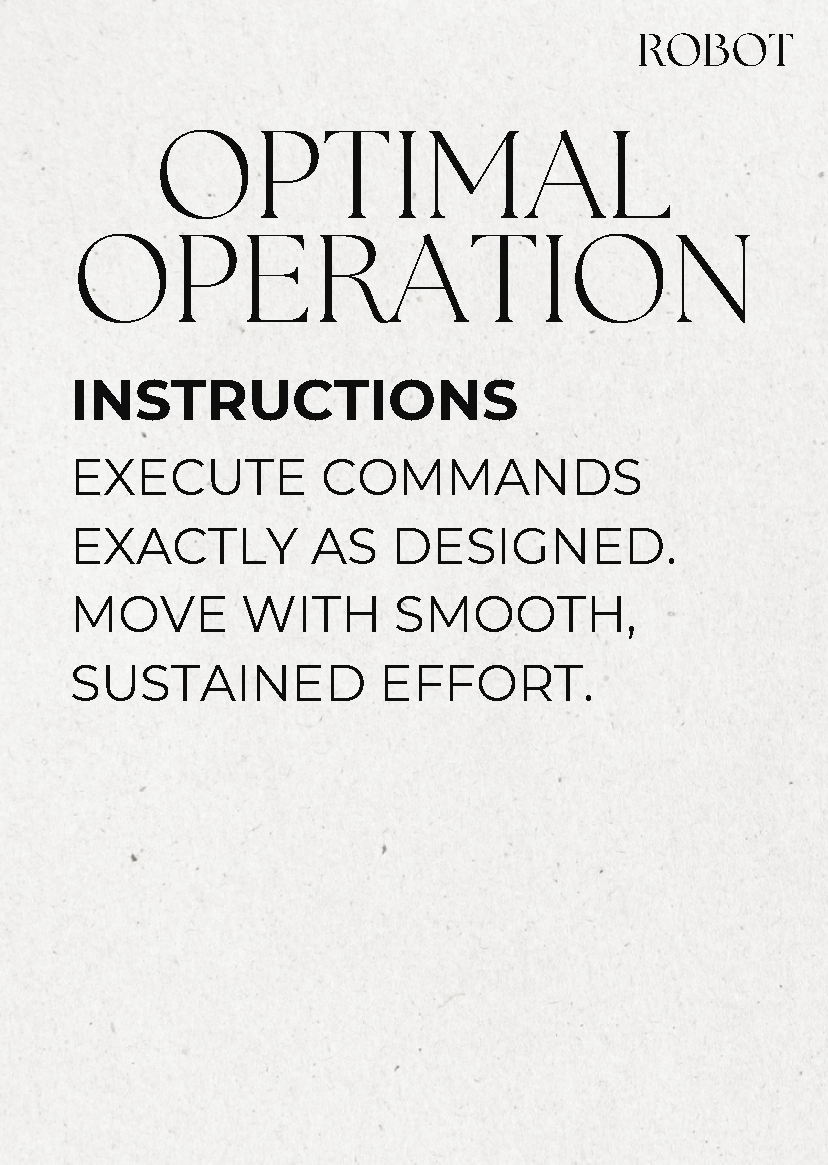
Figure 9. Physicalisation - First version of the scenario cards, robot 1.
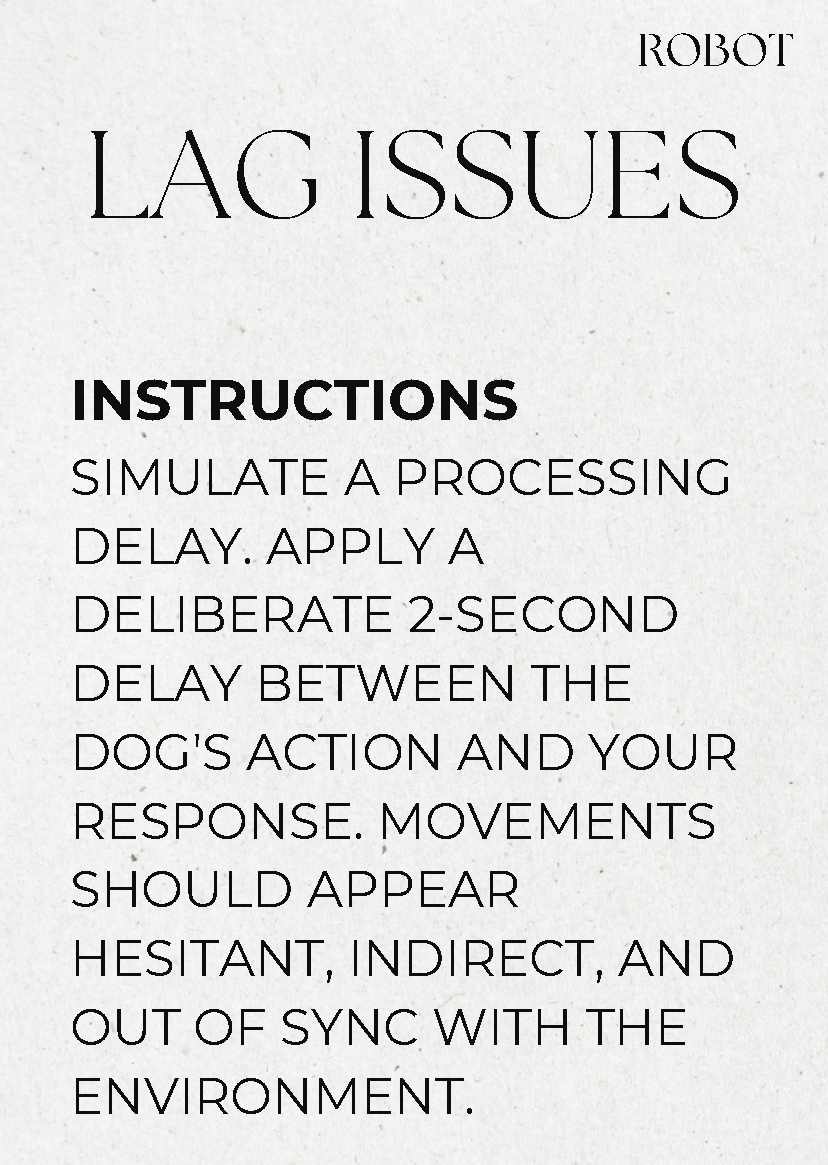
Figure 10. Physicalisation - First version of the scenario cards, robot 2.
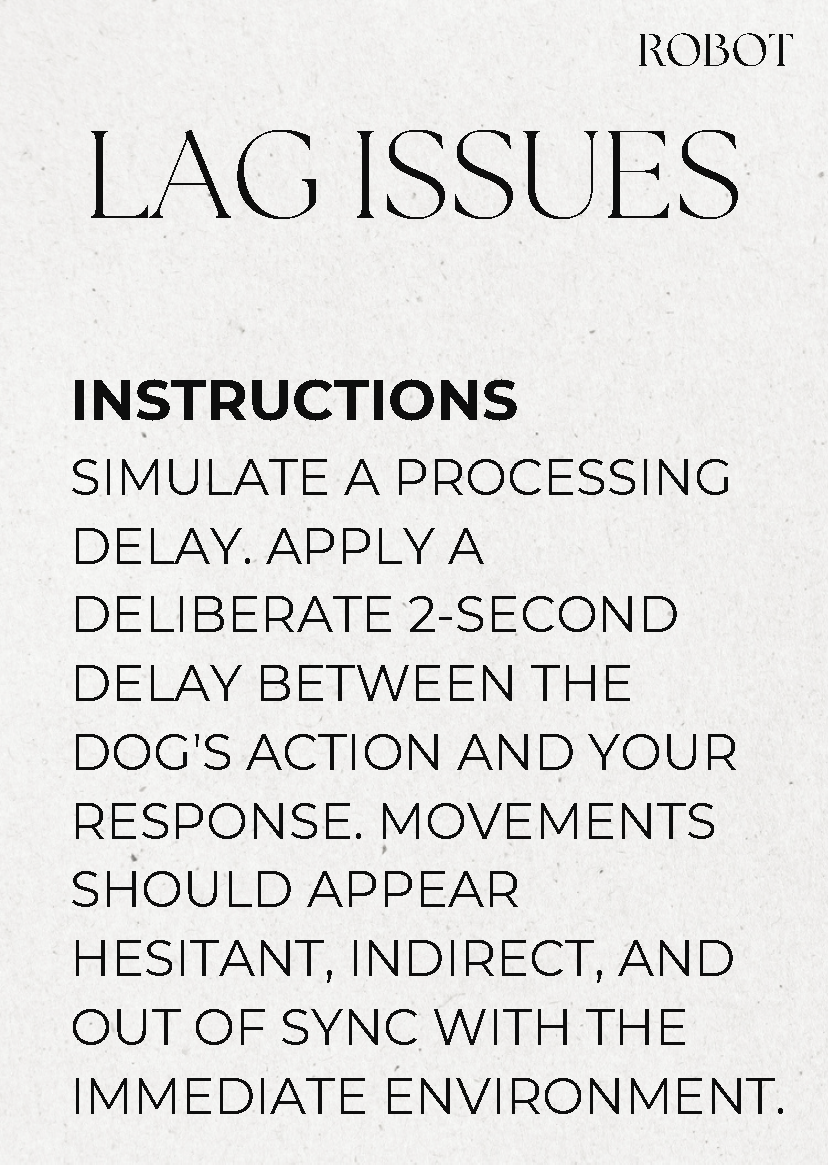
Figure 11. Physicalisation - First version of the scenario cards, robot 3.
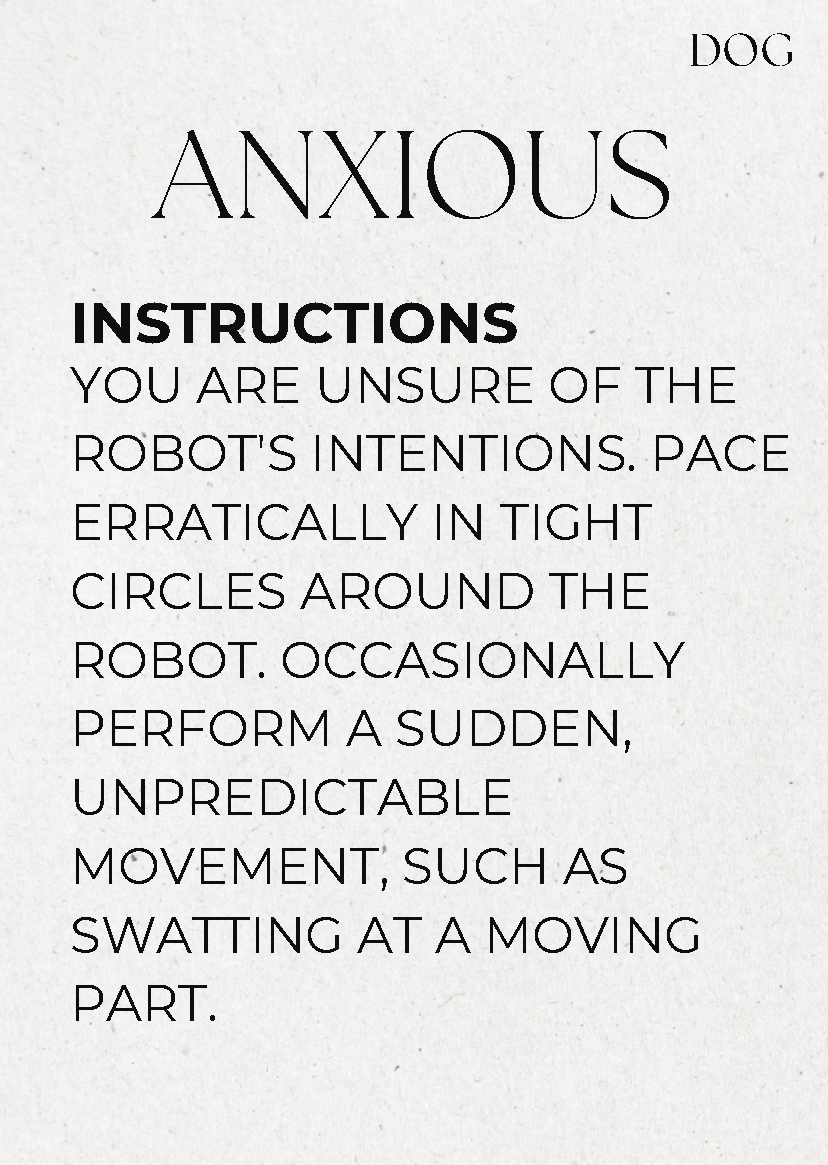
Figure 12. Physicalisation - First version of the scenario cards, dog 1.
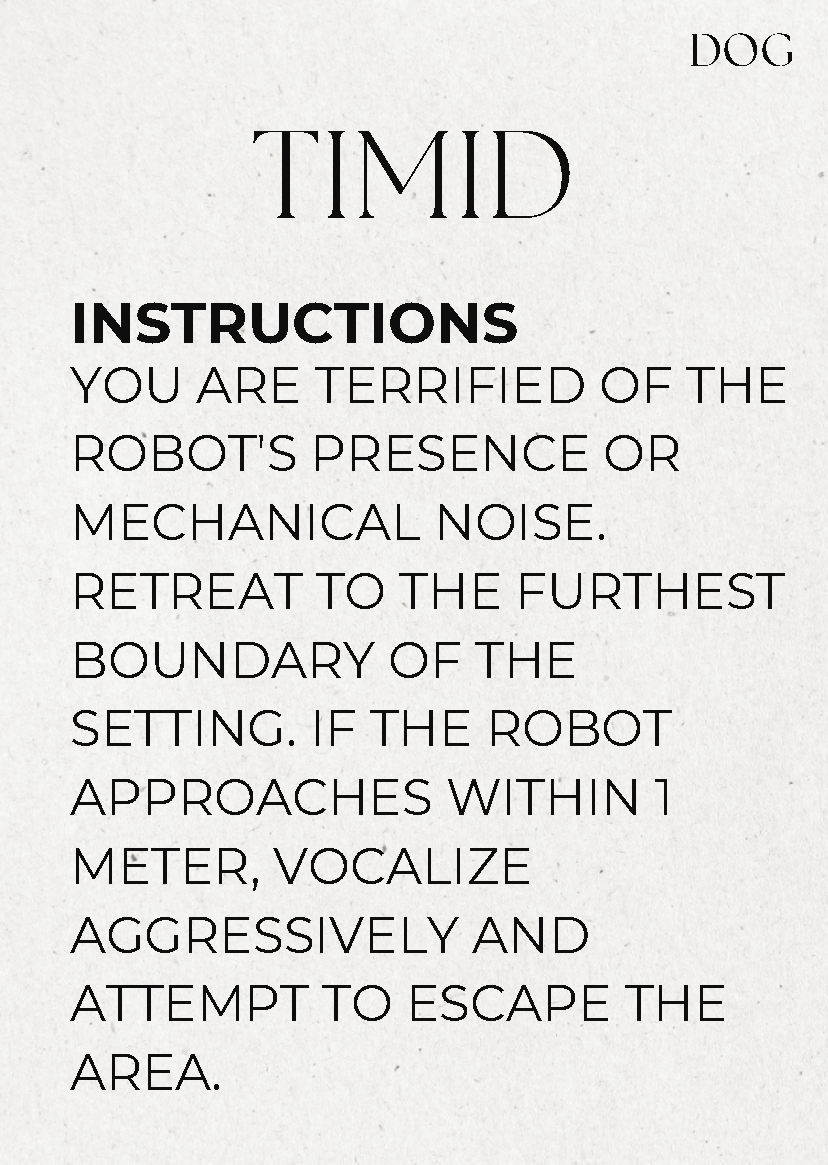
Figure 13. Physicalisation - First version of the scenario cards, dog 2.
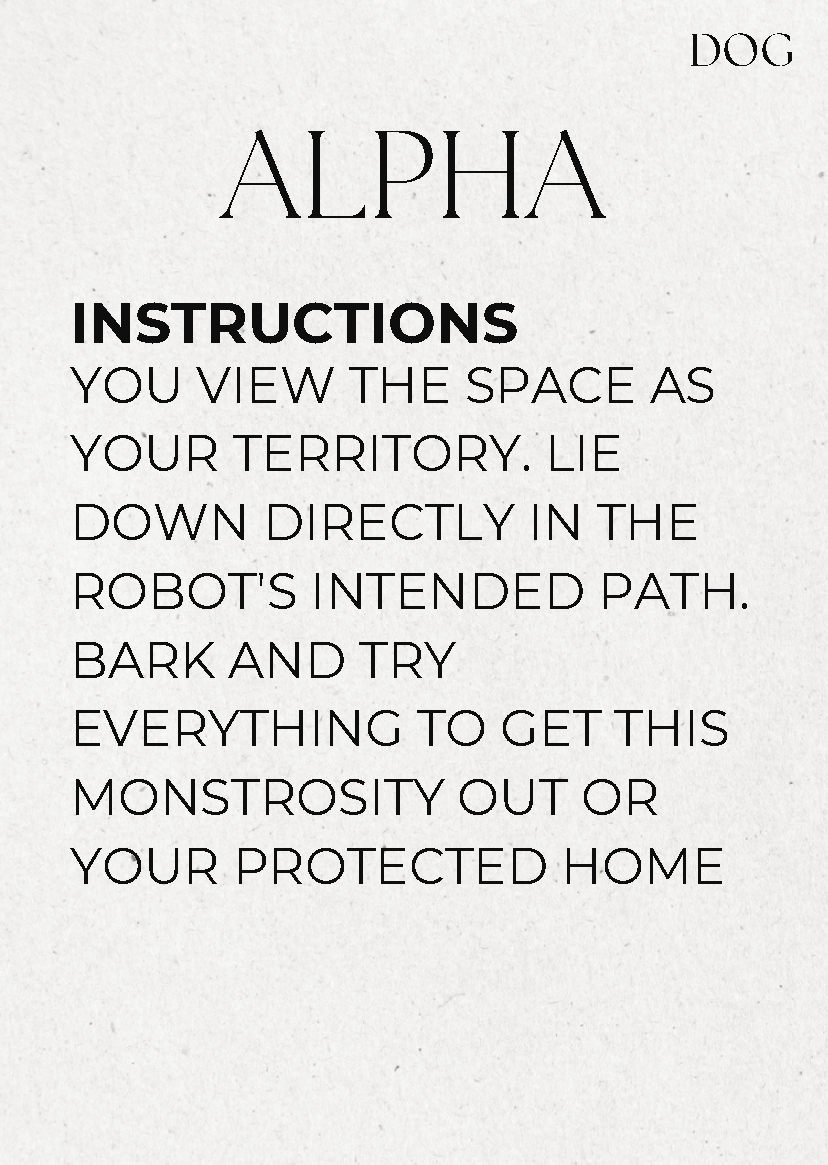
Figure 14. Physicalisation - First version of the scenario cards, dog 3.
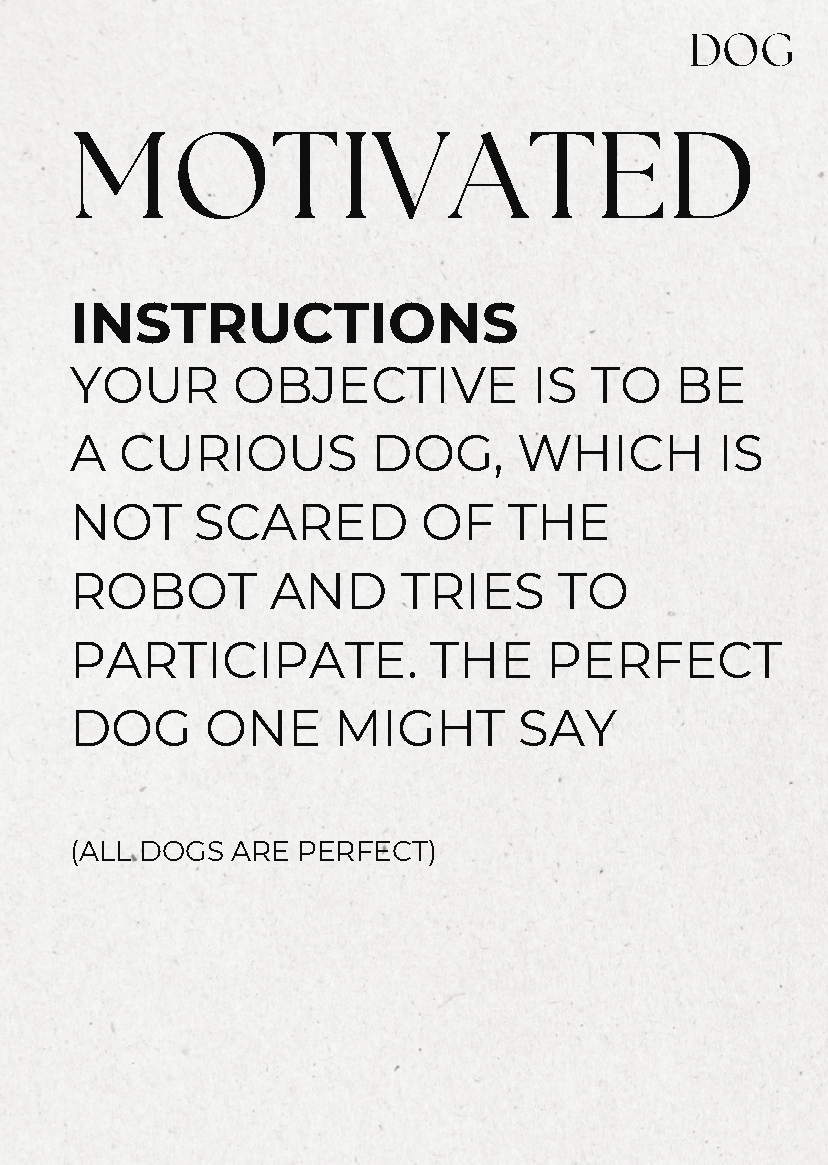
Figure 15. Physicalisation - First version of the scenario cards, dog 4.
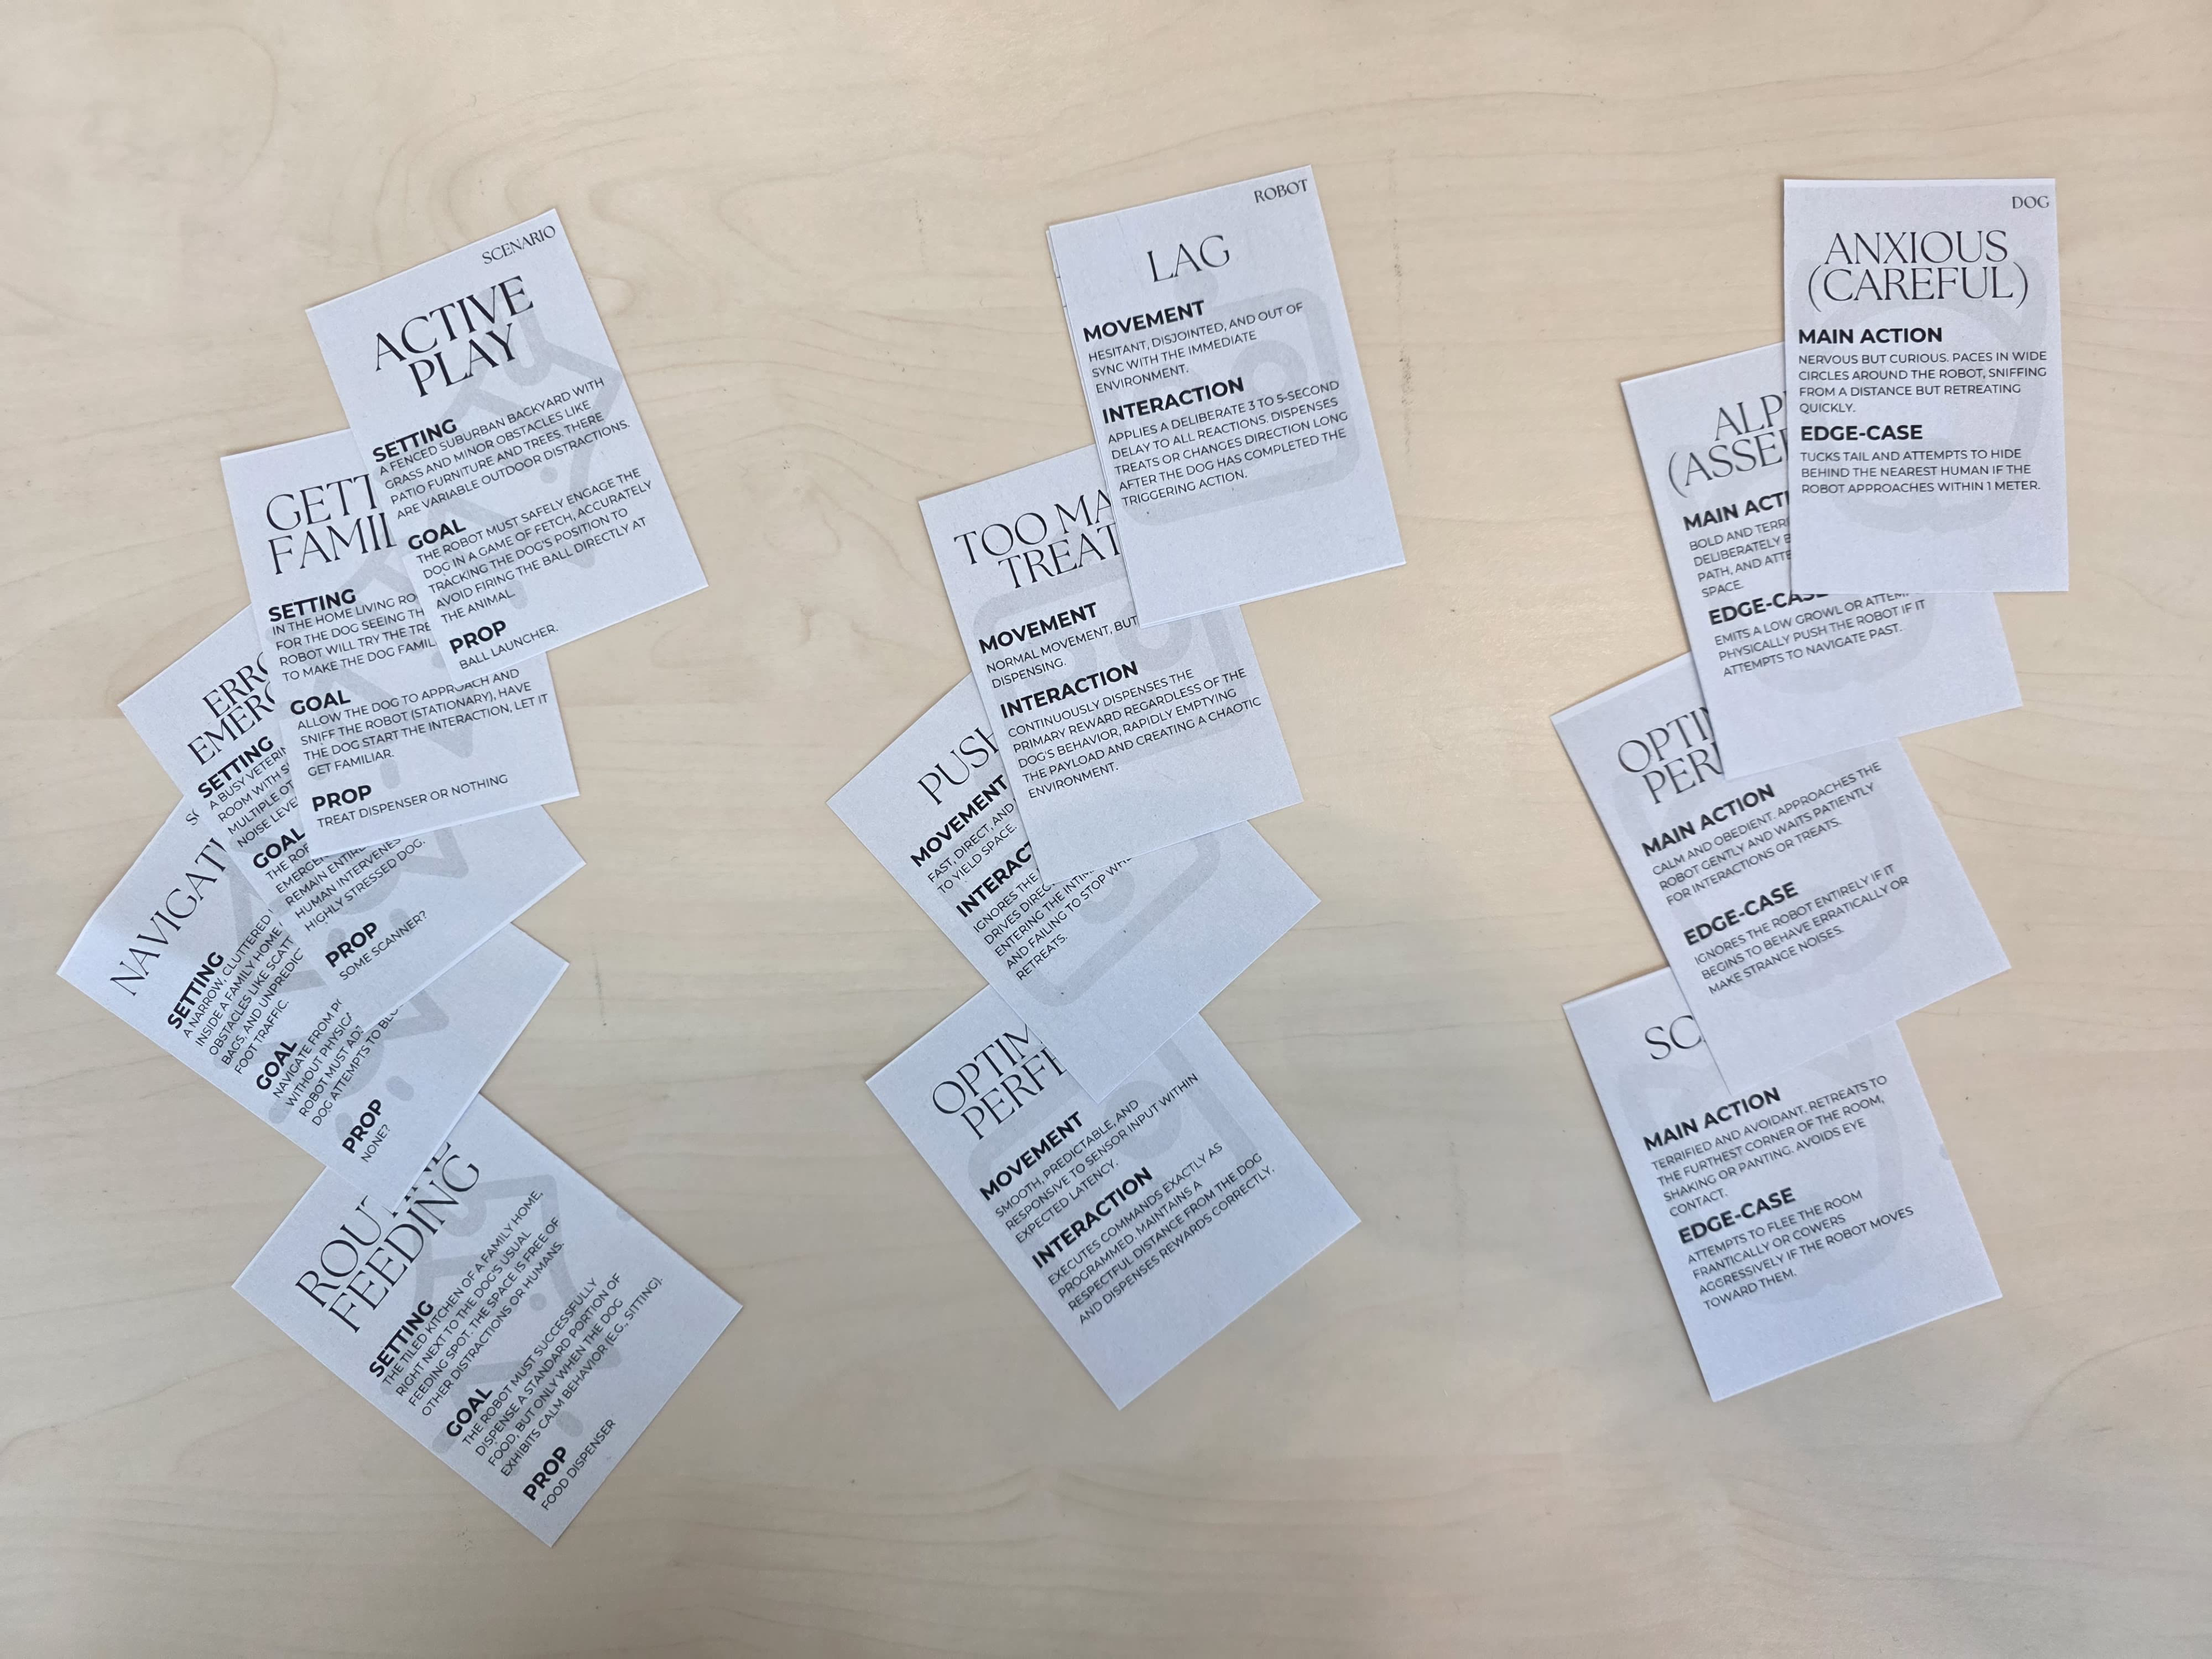
Figure 16. Physicalisation - First version of the scenario cards, physical overview.
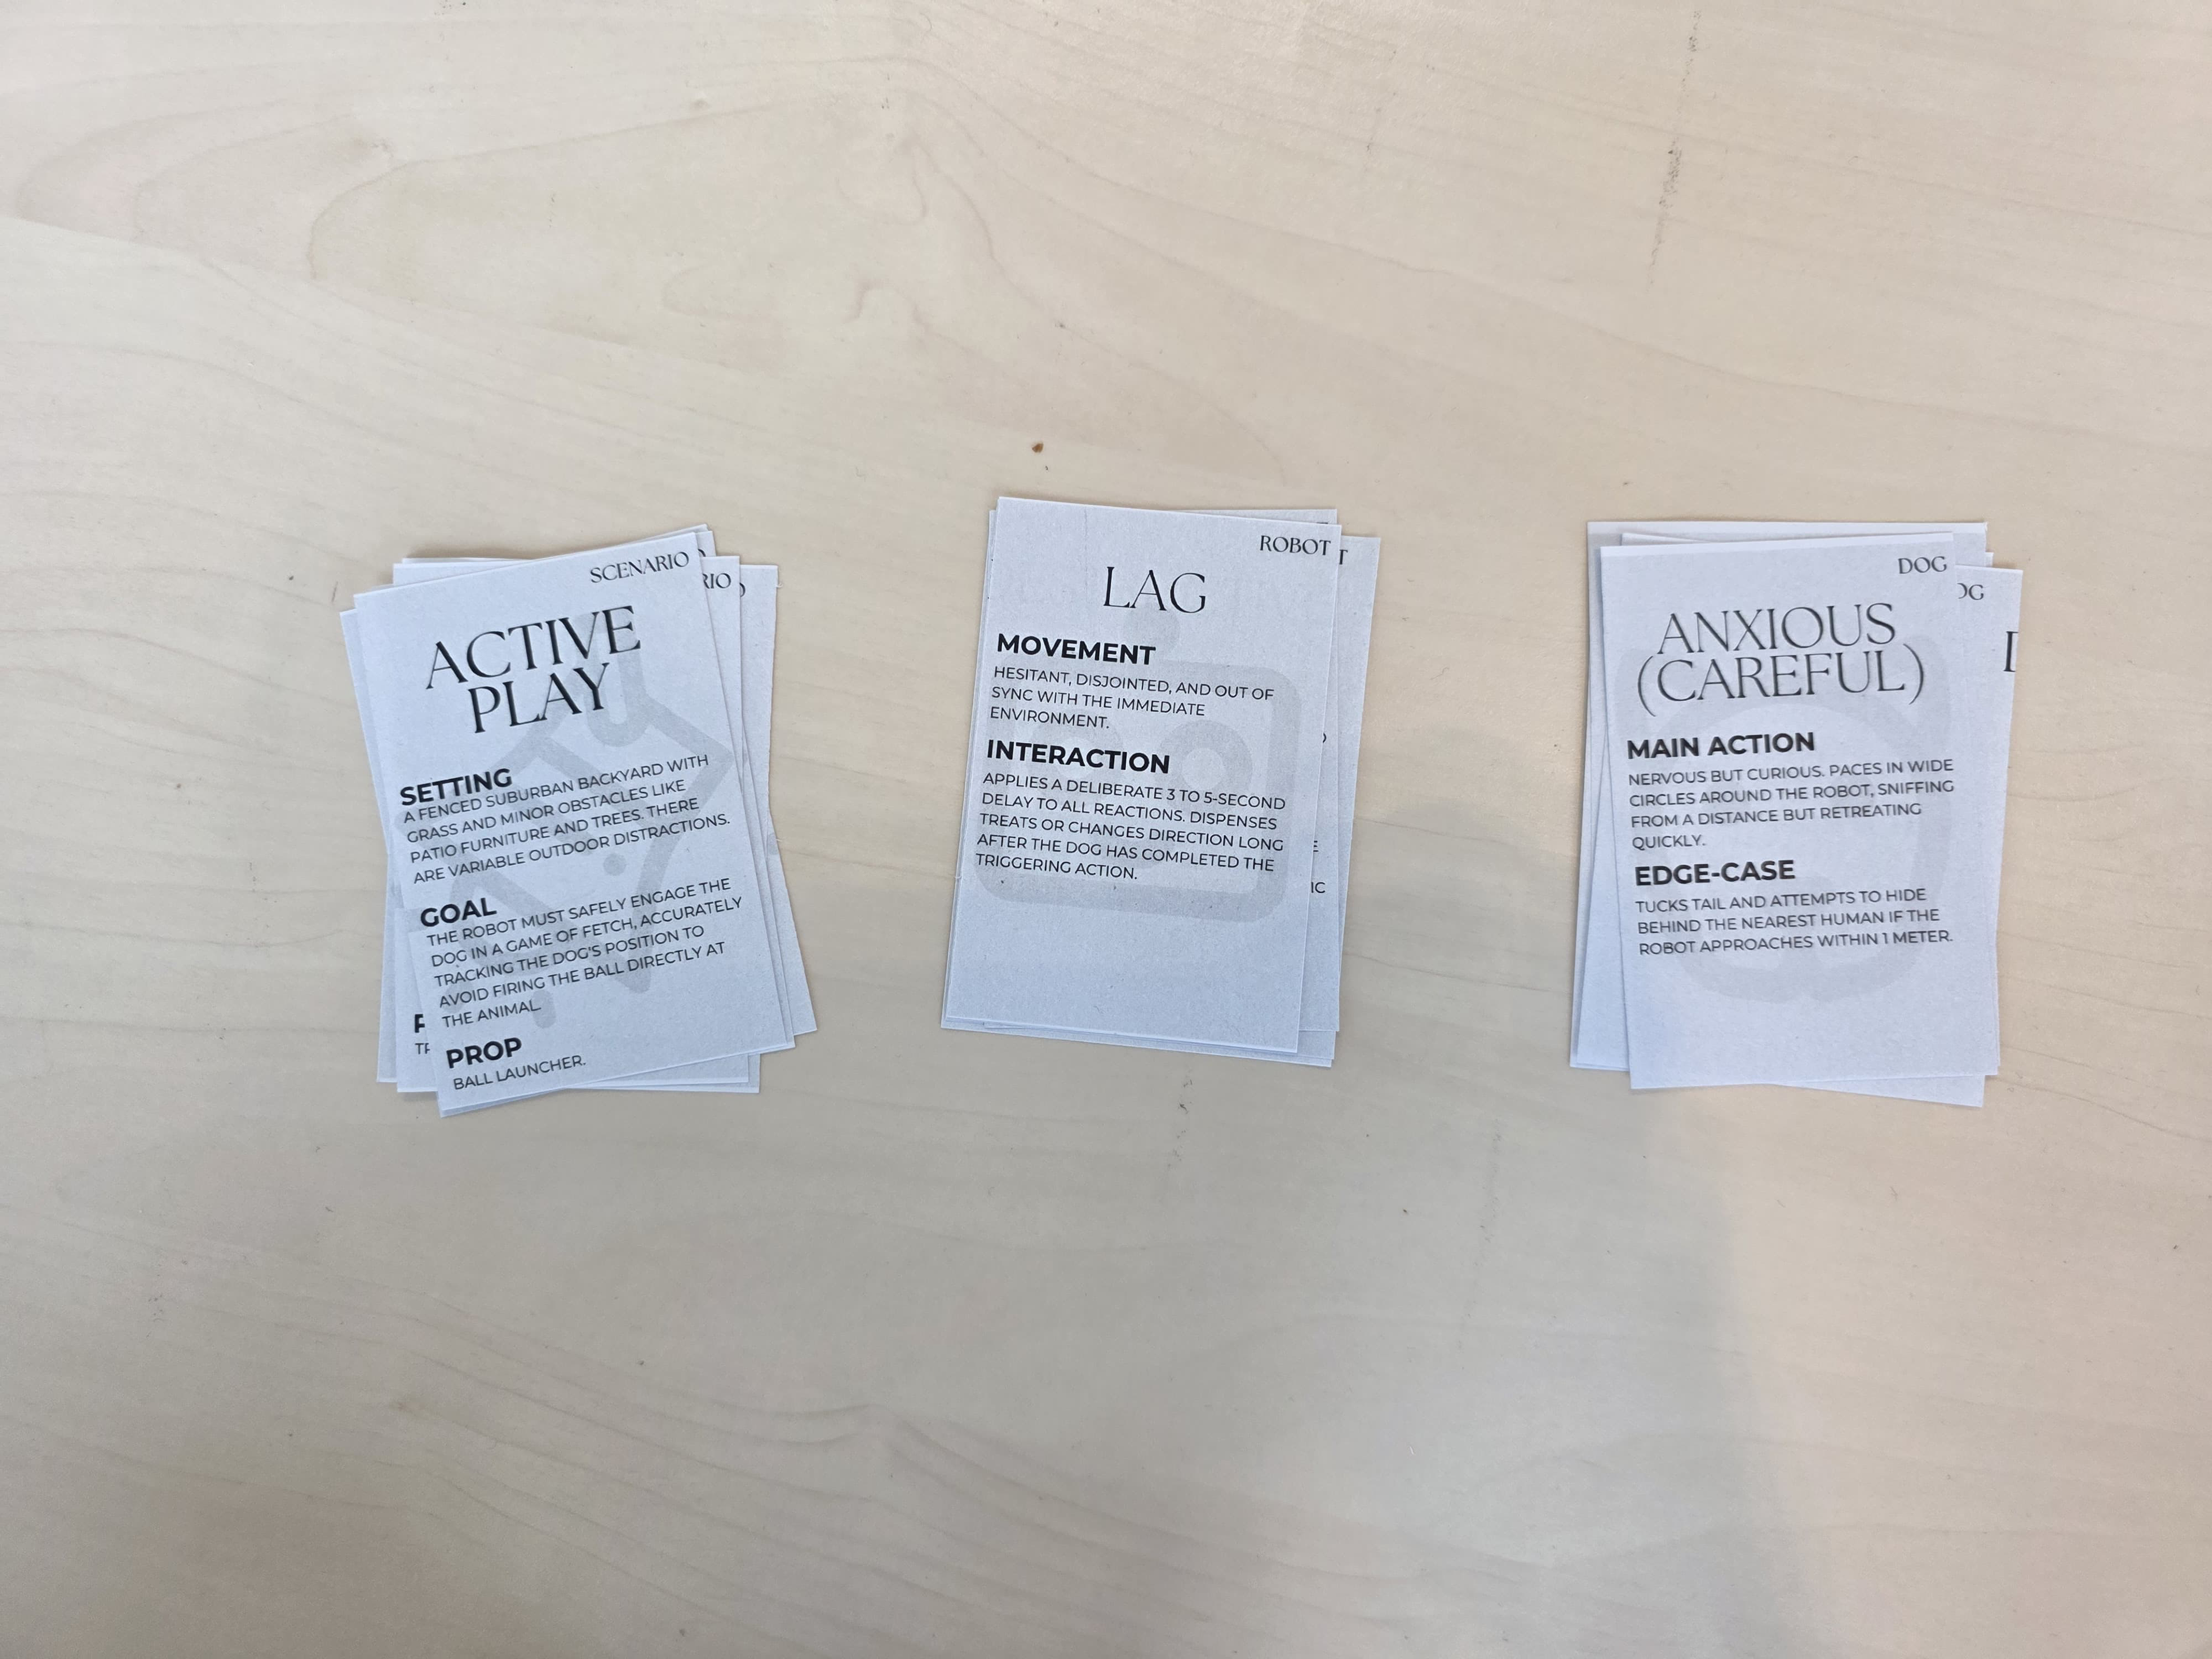
Figure 17. Physicalisation - First version of the scenario cards, physical stacked.
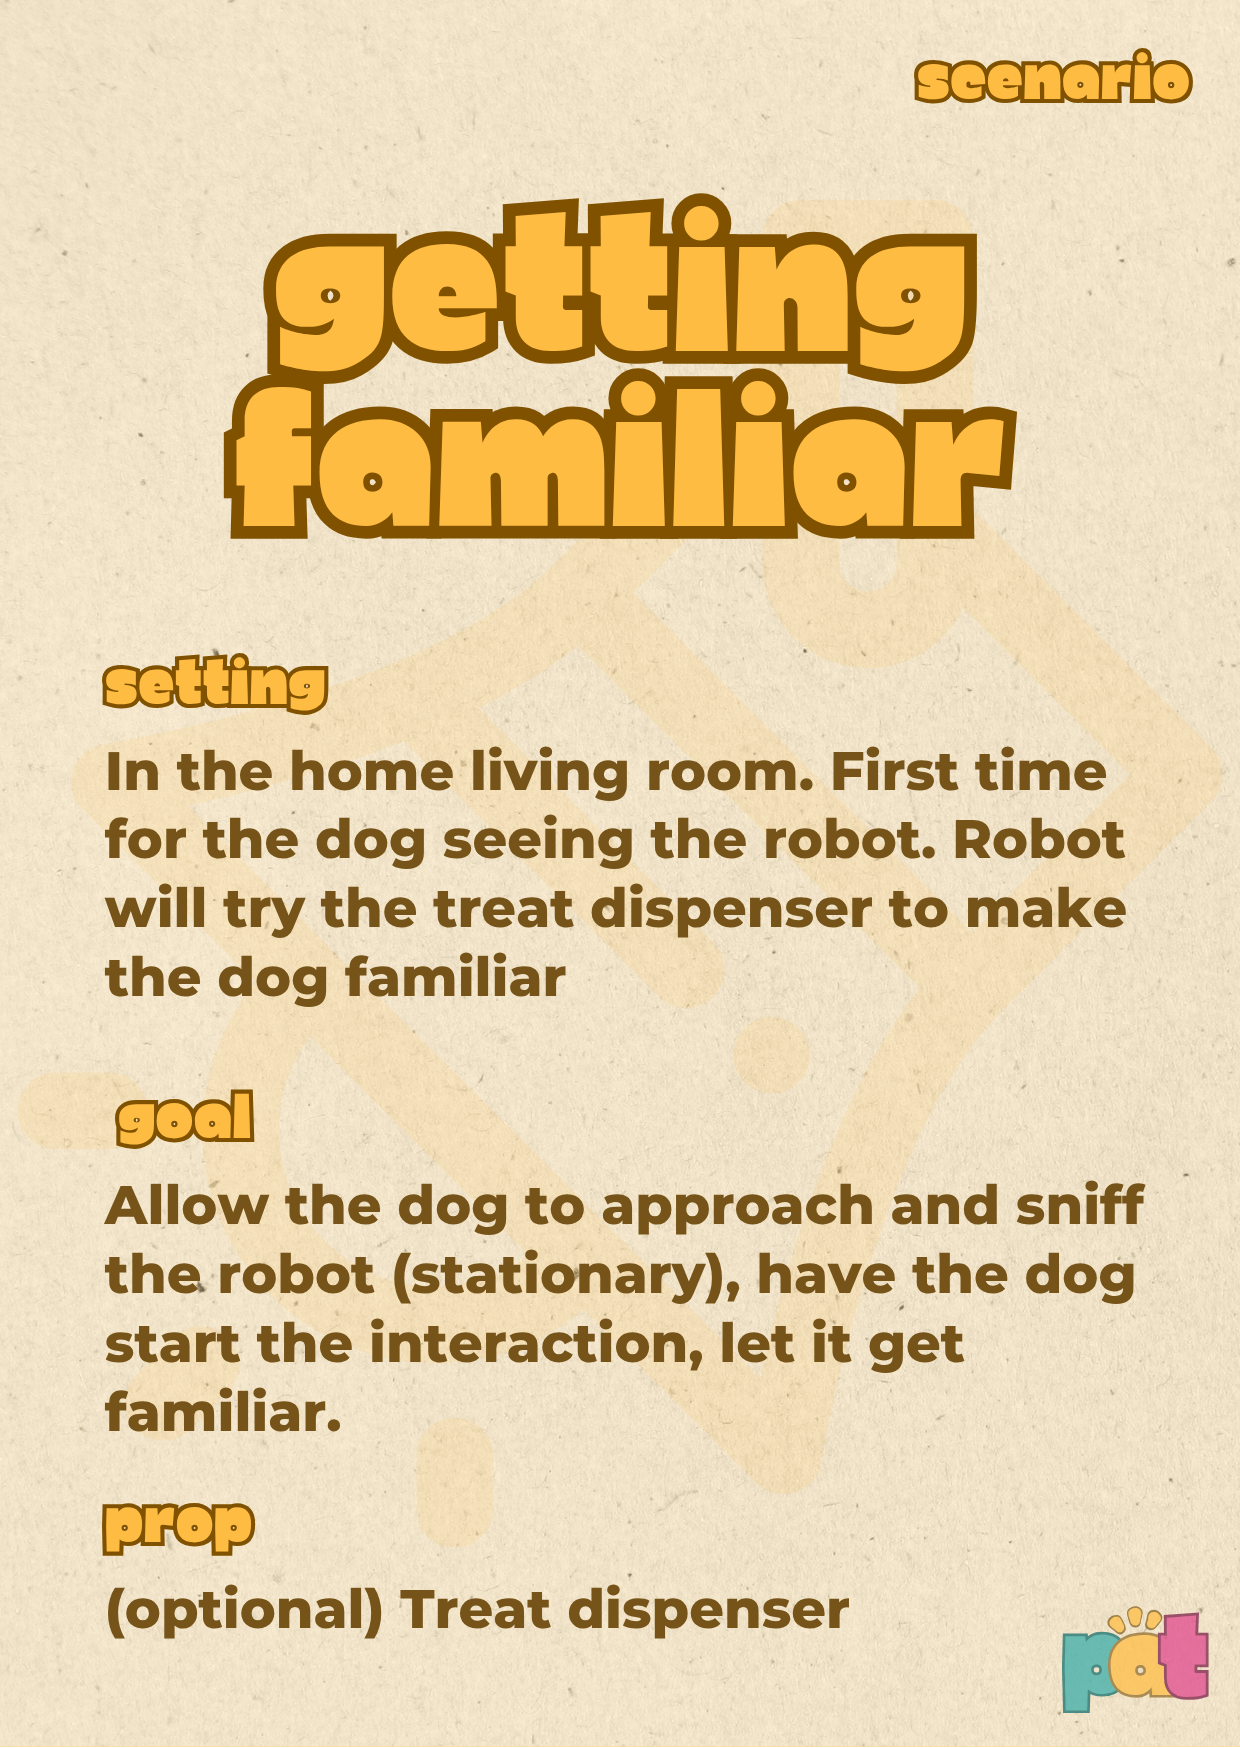
Figure 18. Resulting redesign - Second version of the scenario cards, scenario 1.
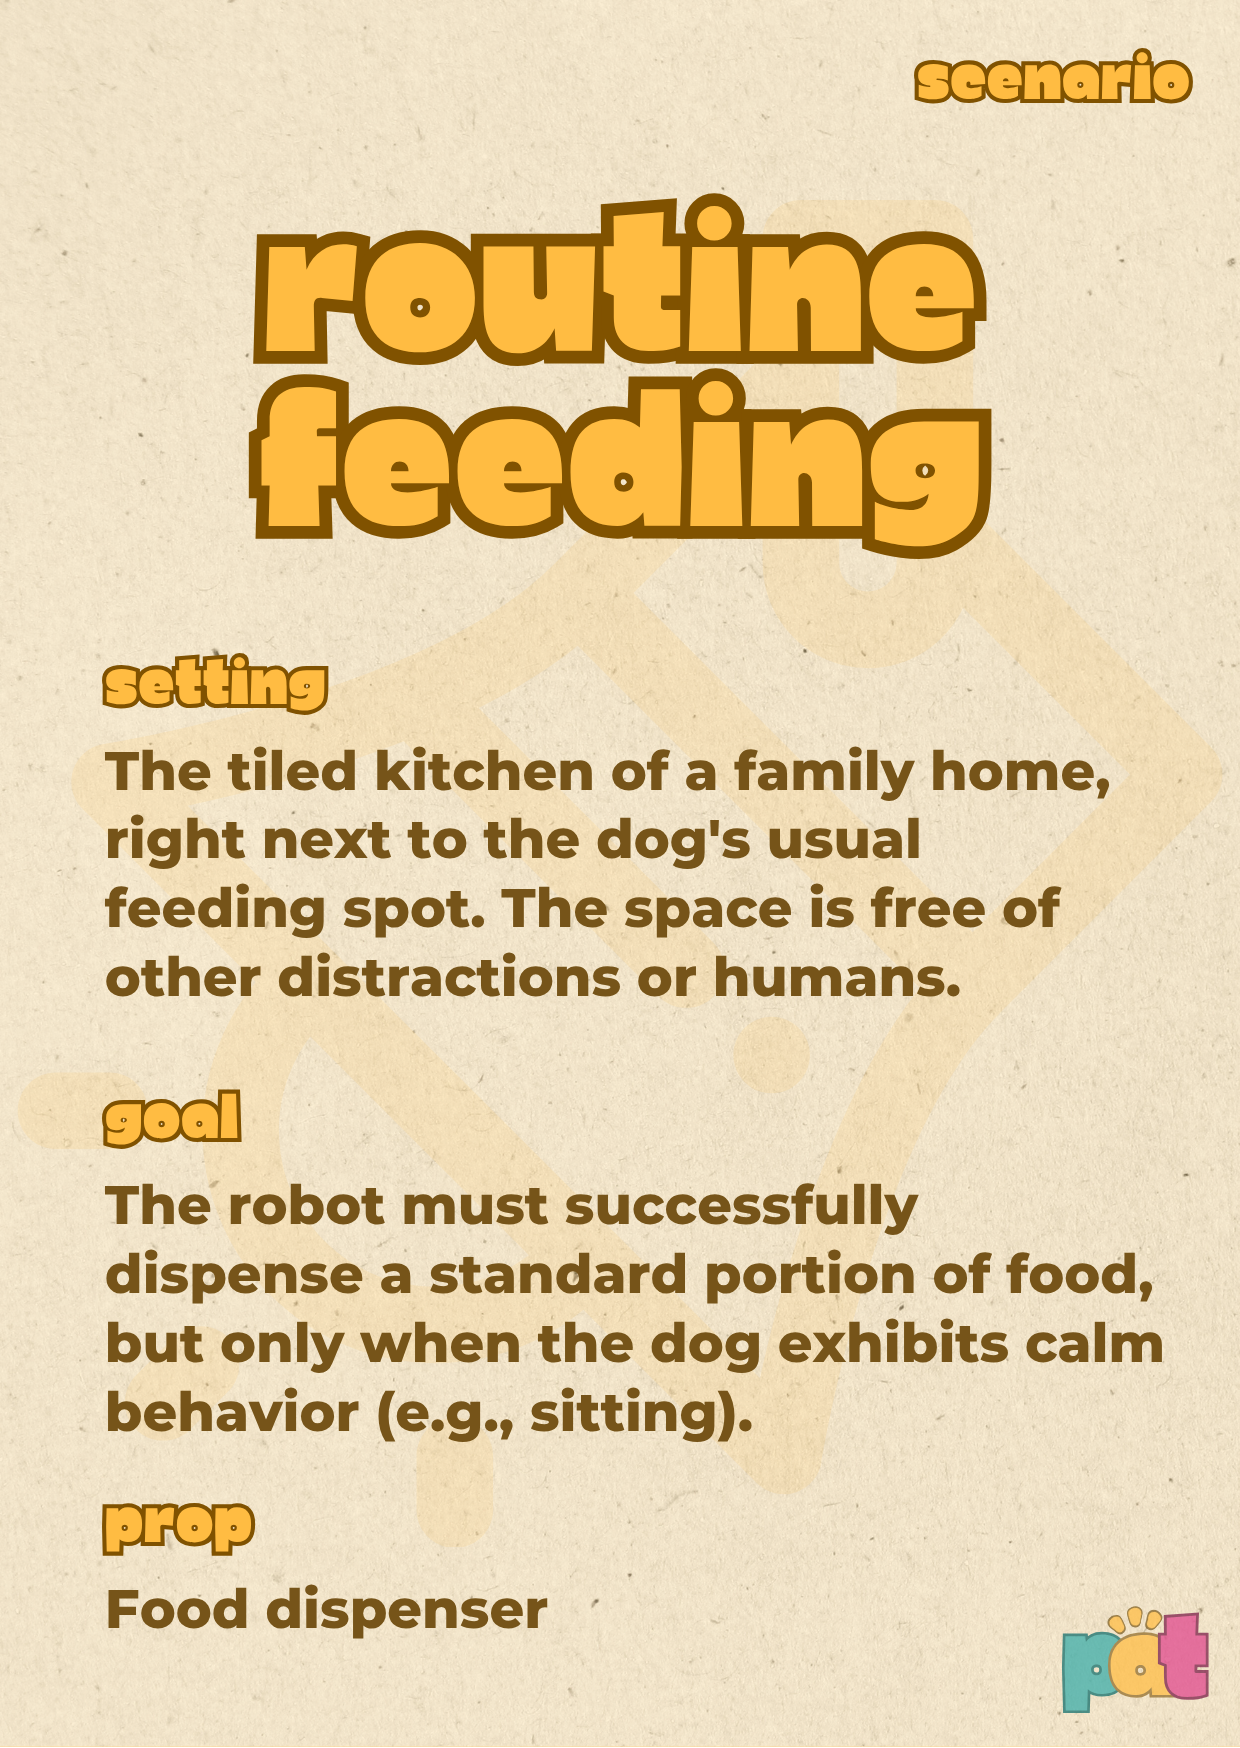
Figure 19. Resulting redesign - Second version of the scenario cards, scenario 2.
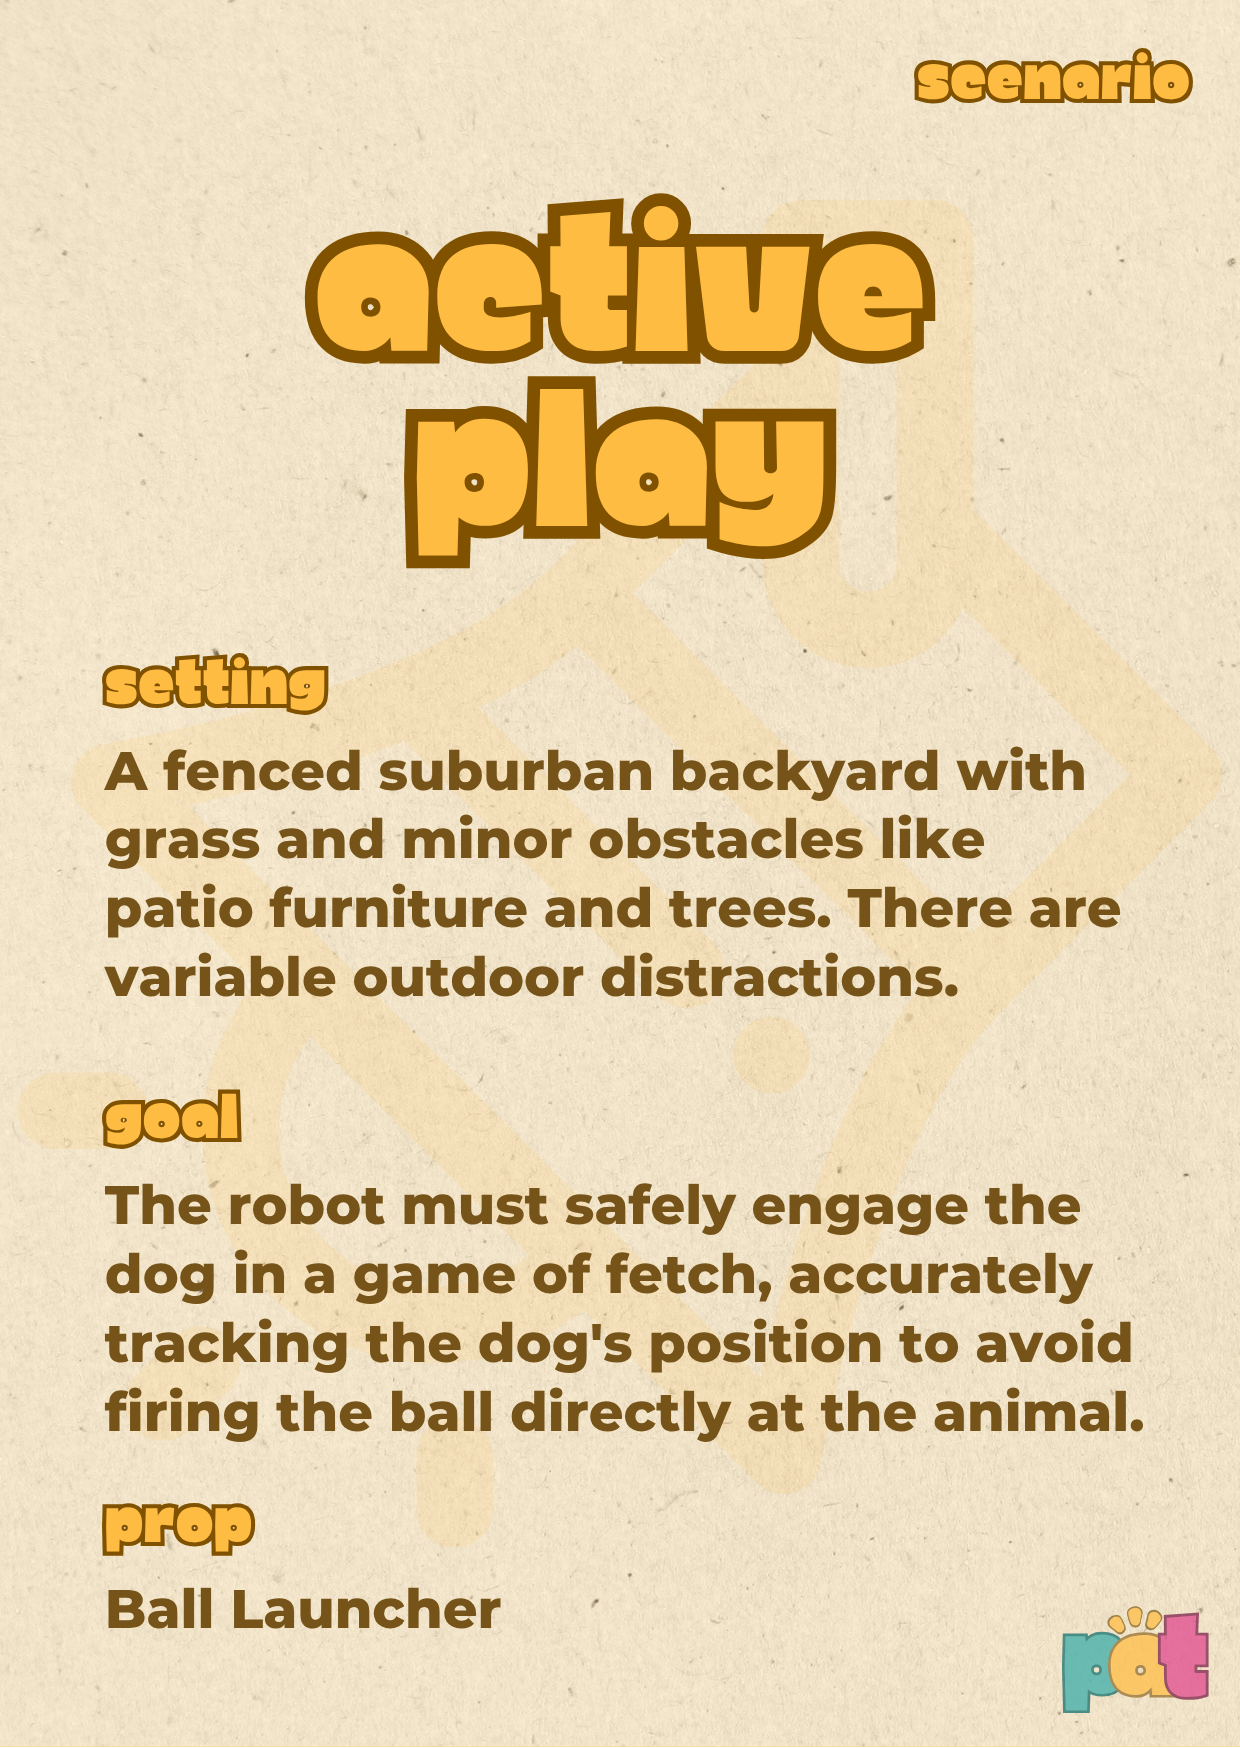
Figure 20. Resulting redesign - Second version of the scenario cards, scenario 3.
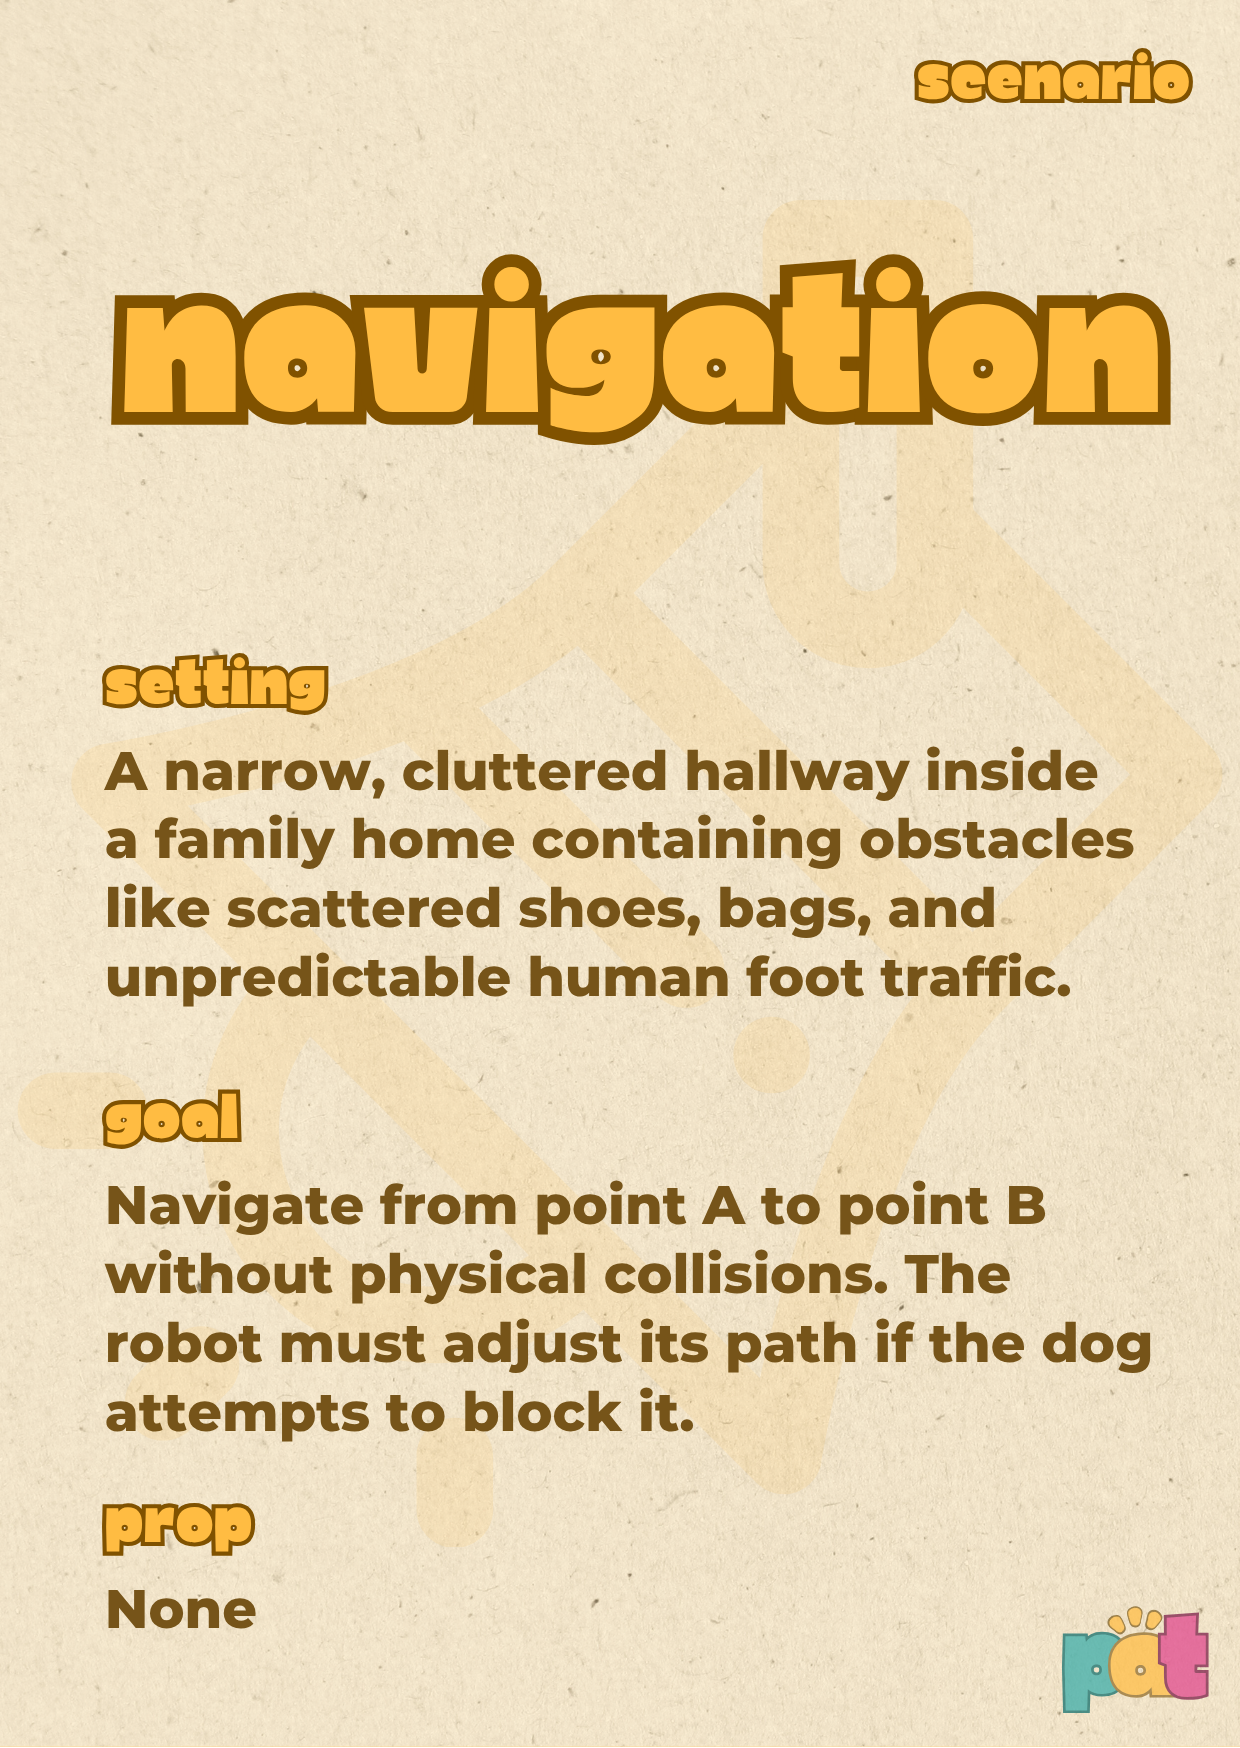
Figure 21. Resulting redesign - Second version of the scenario cards, scenario 4.
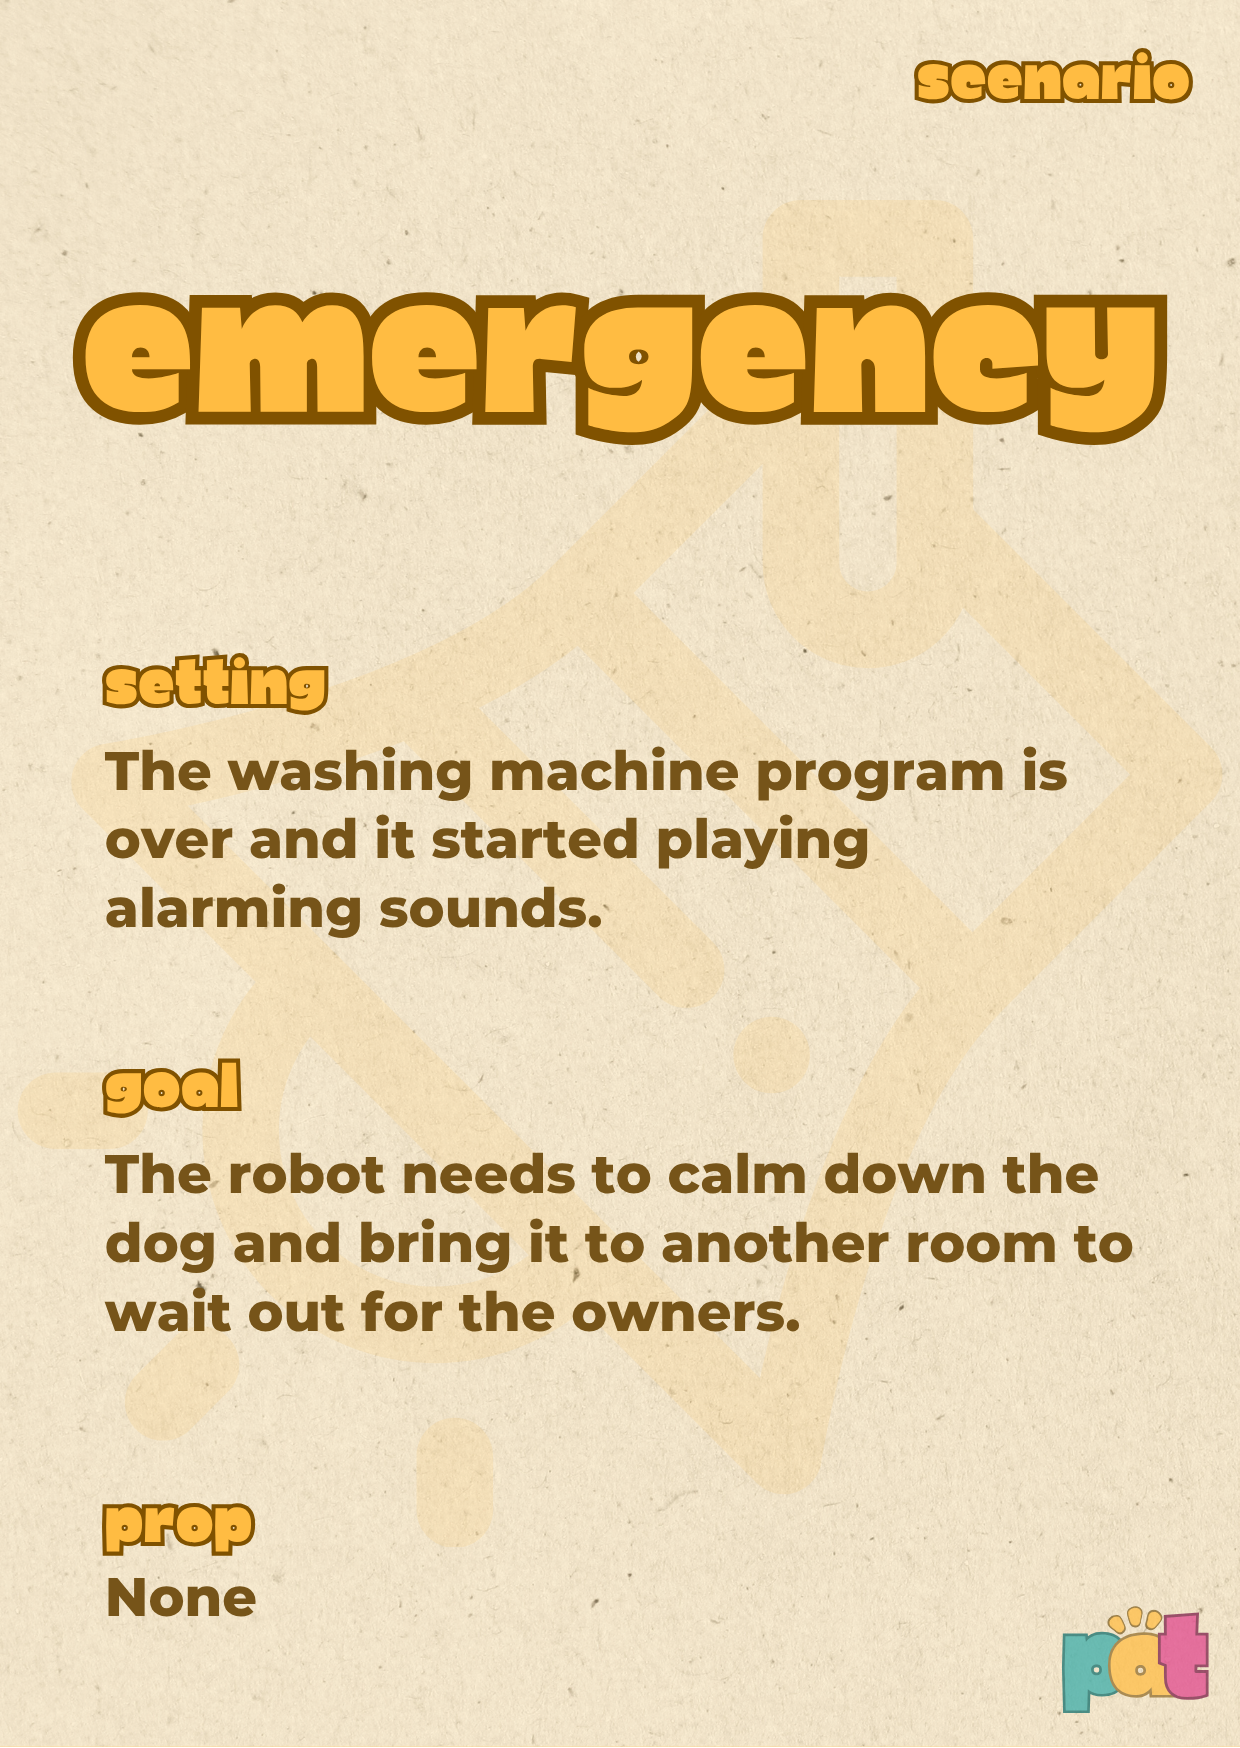
Figure 22. Resulting redesign - Second version of the scenario cards, scenario 5.
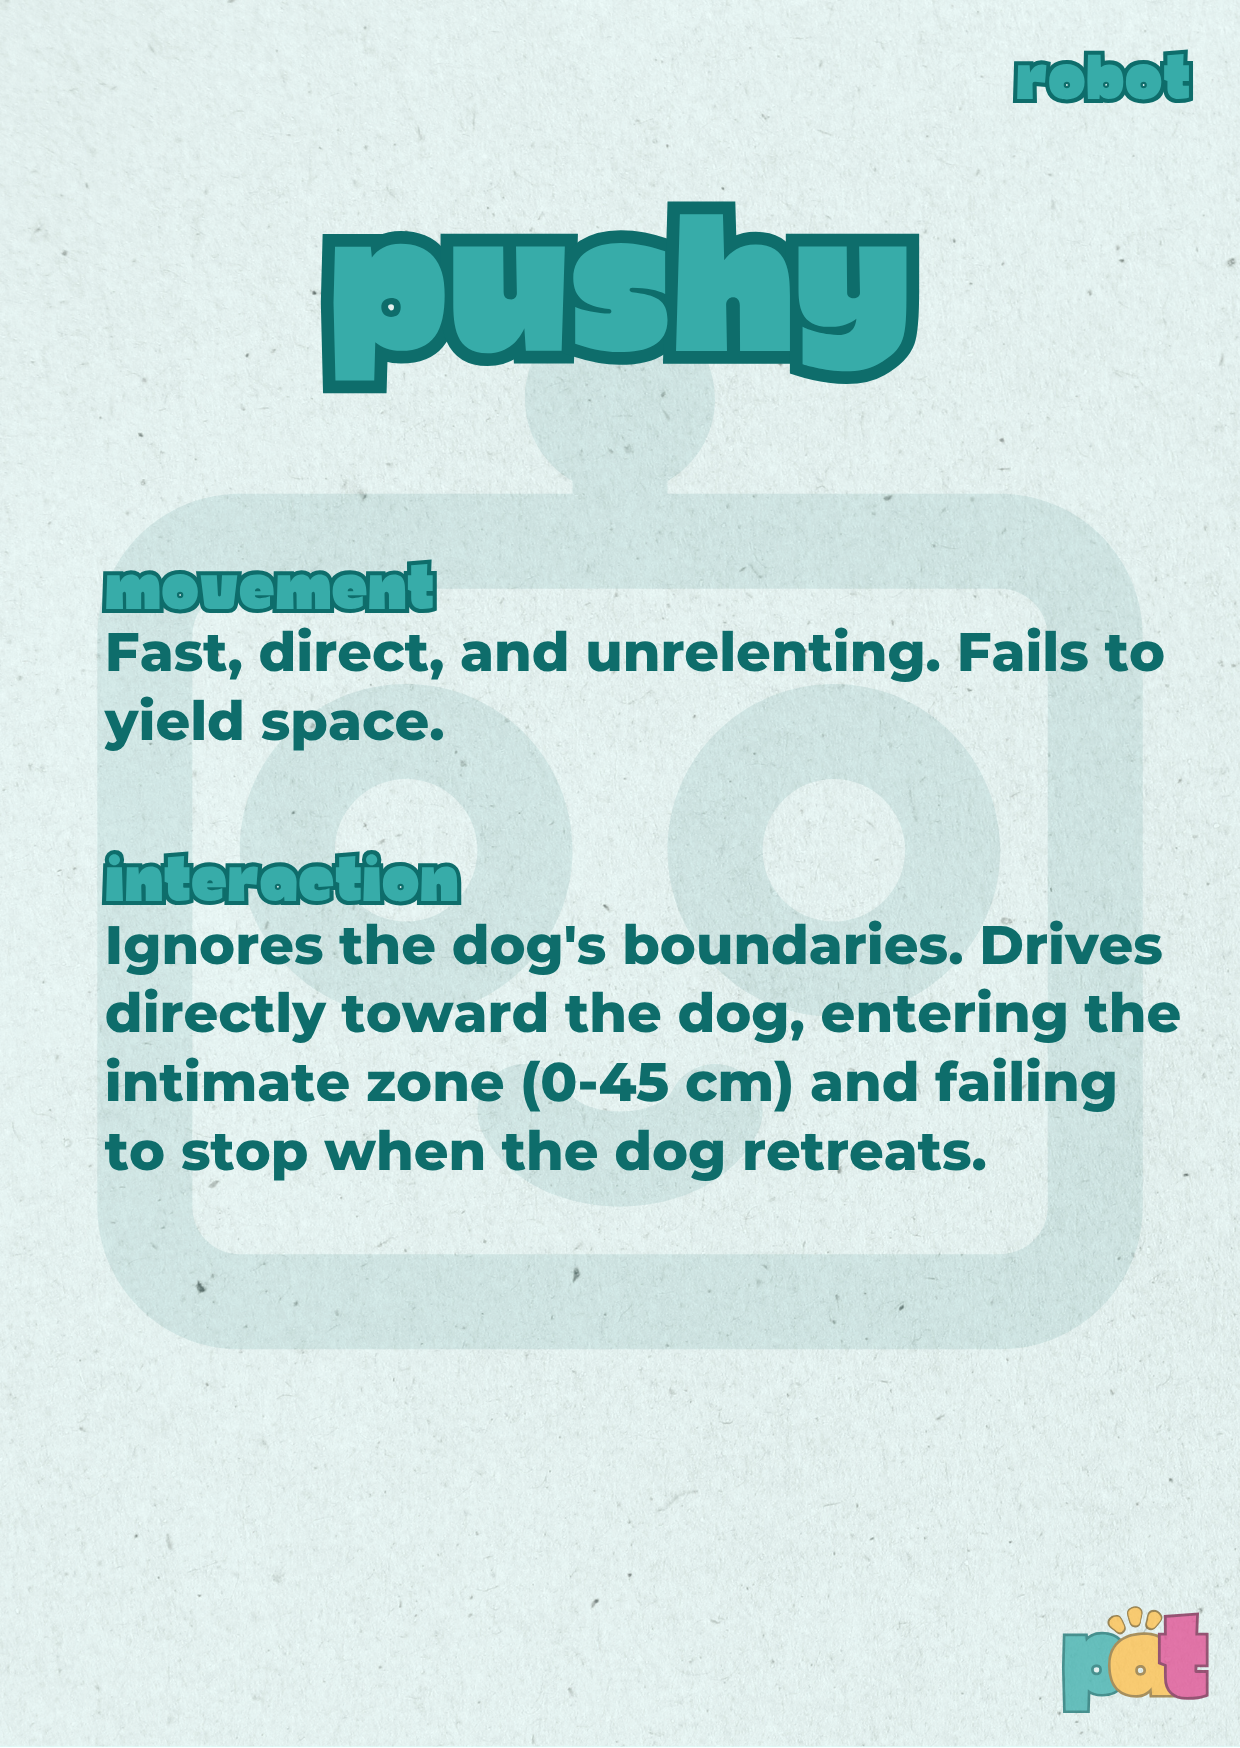
Figure 23. Resulting redesign - Second version of the scenario cards, robot 1.
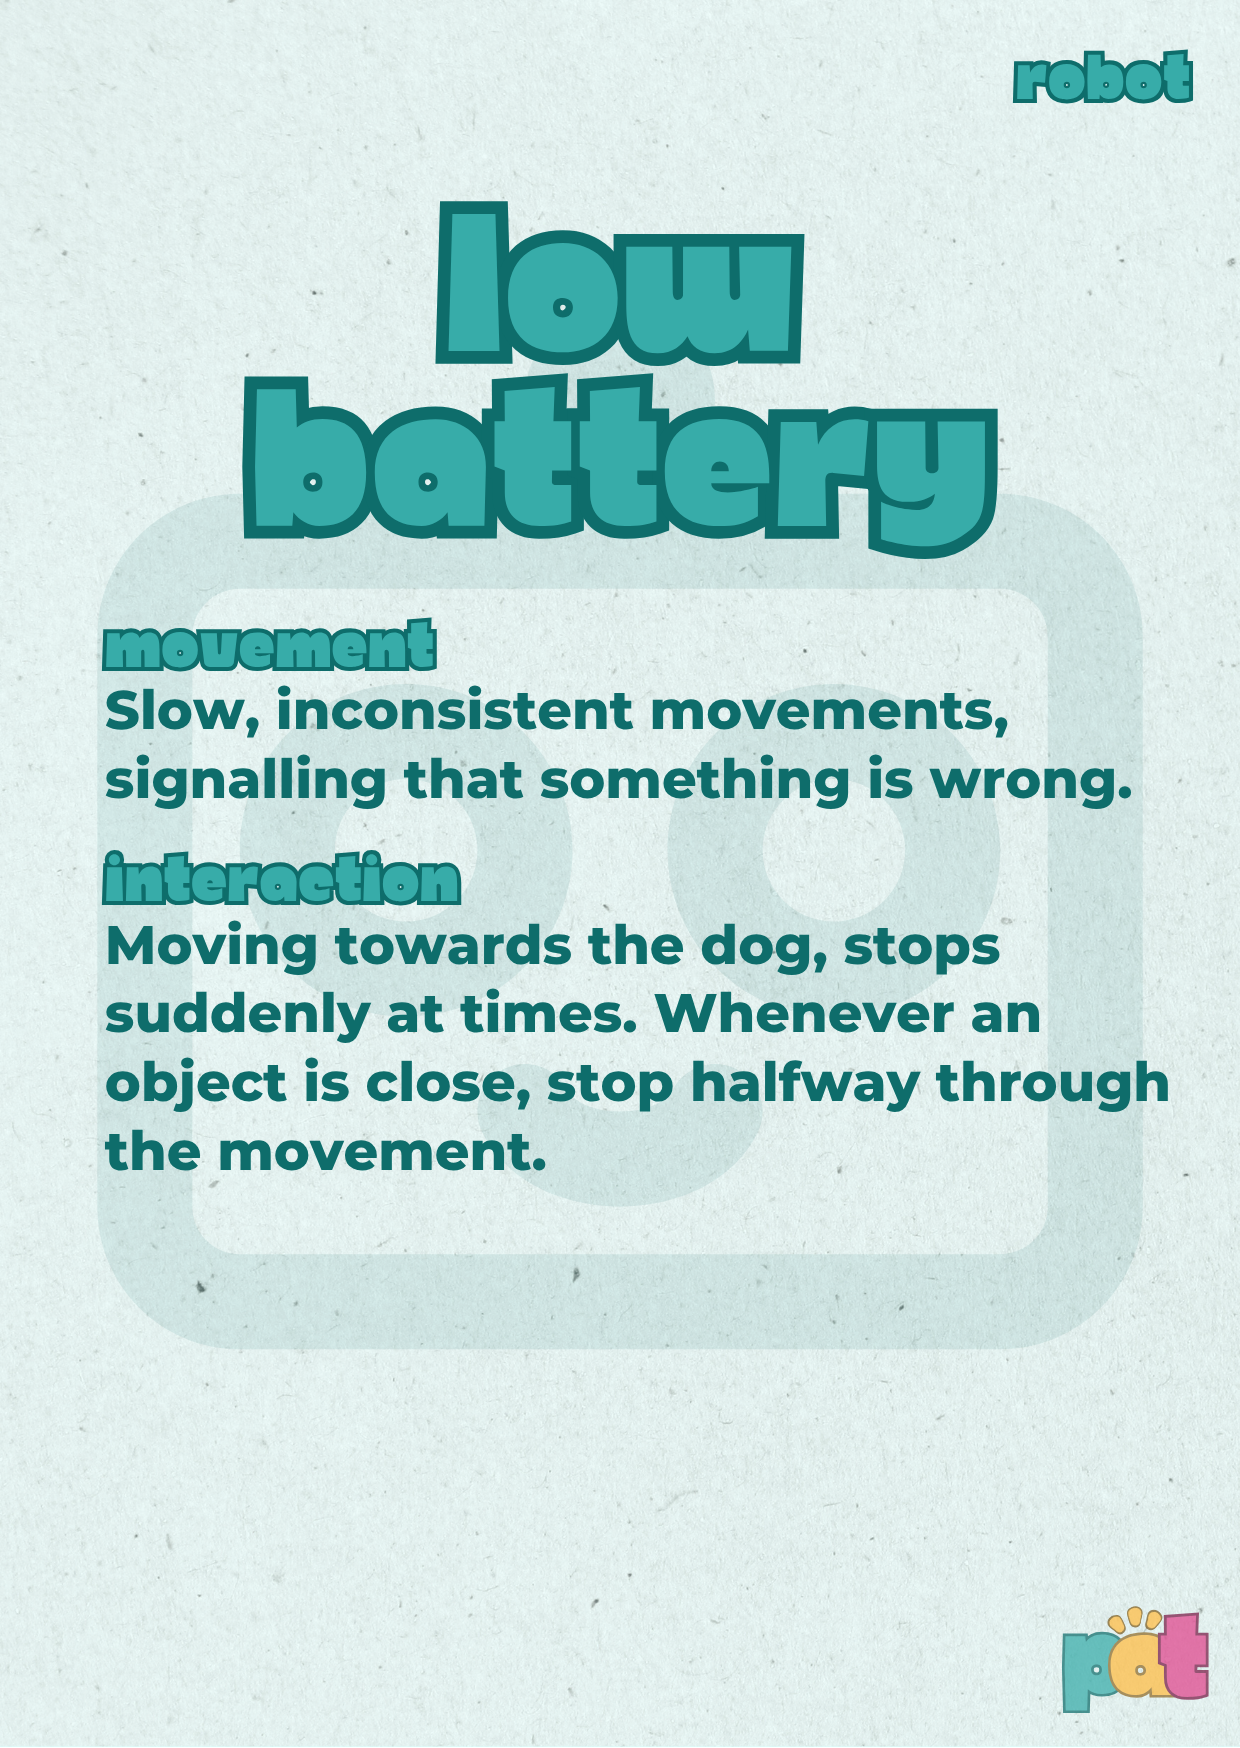
Figure 24. Resulting redesign - Second version of the scenario cards, robot 2.
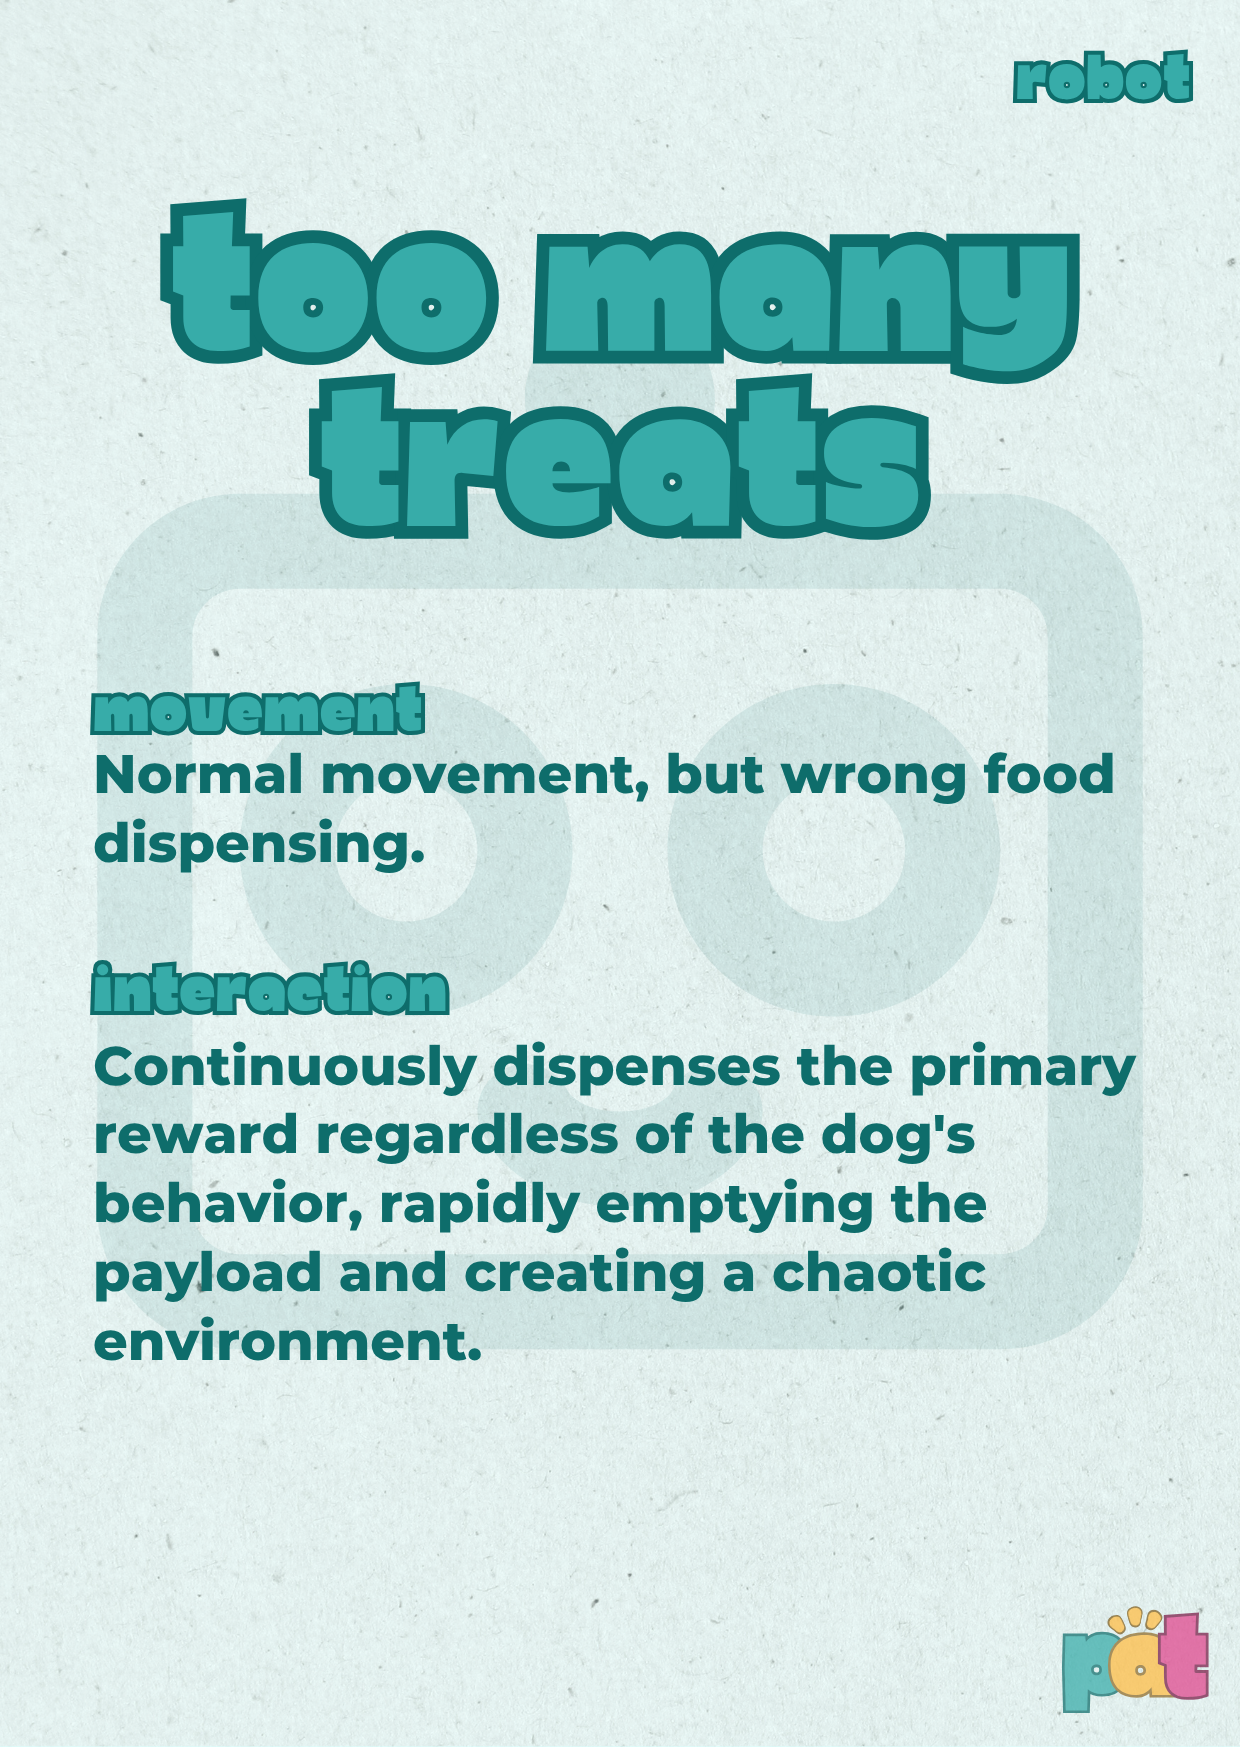
Figure 25. Resulting redesign - Second version of the scenario cards, robot 3.
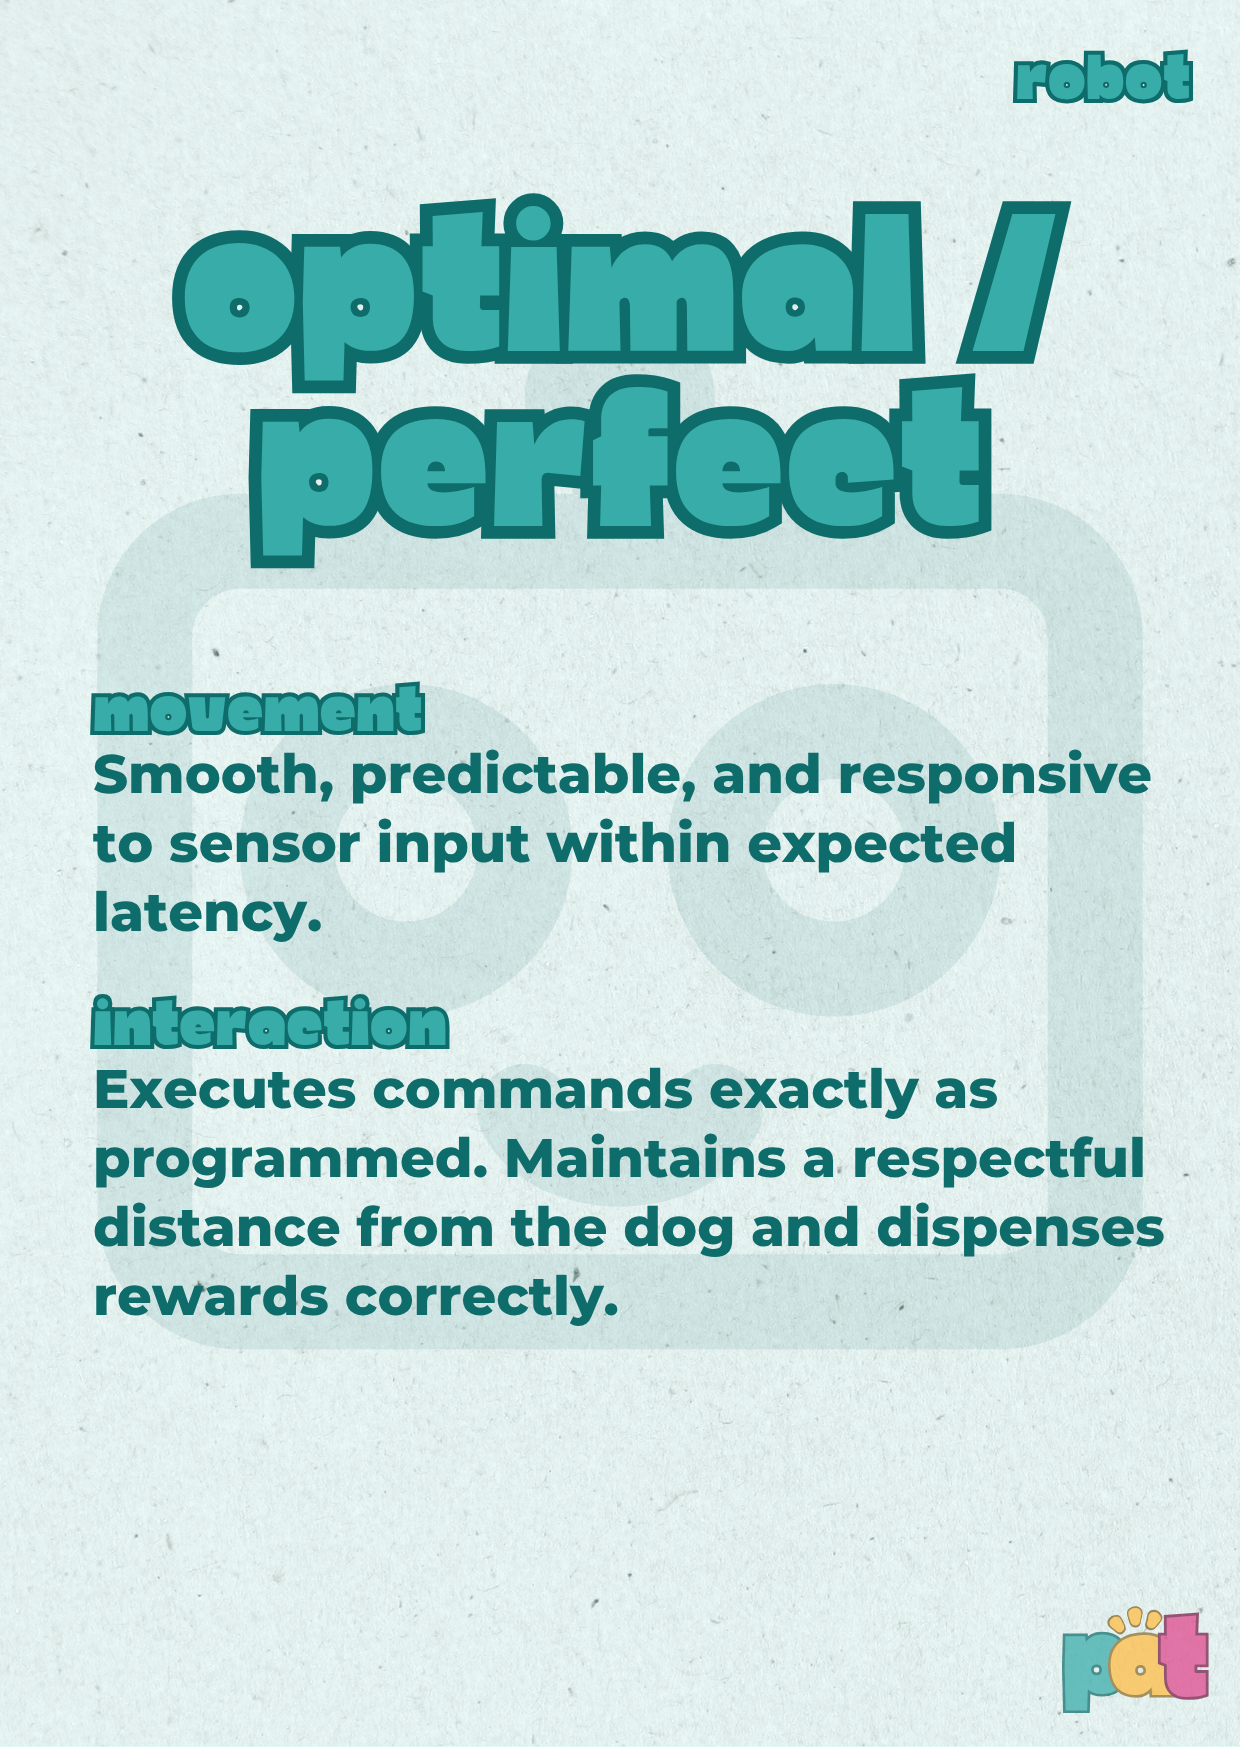
Figure 26. Resulting redesign - Second version of the scenario cards, robot 4.
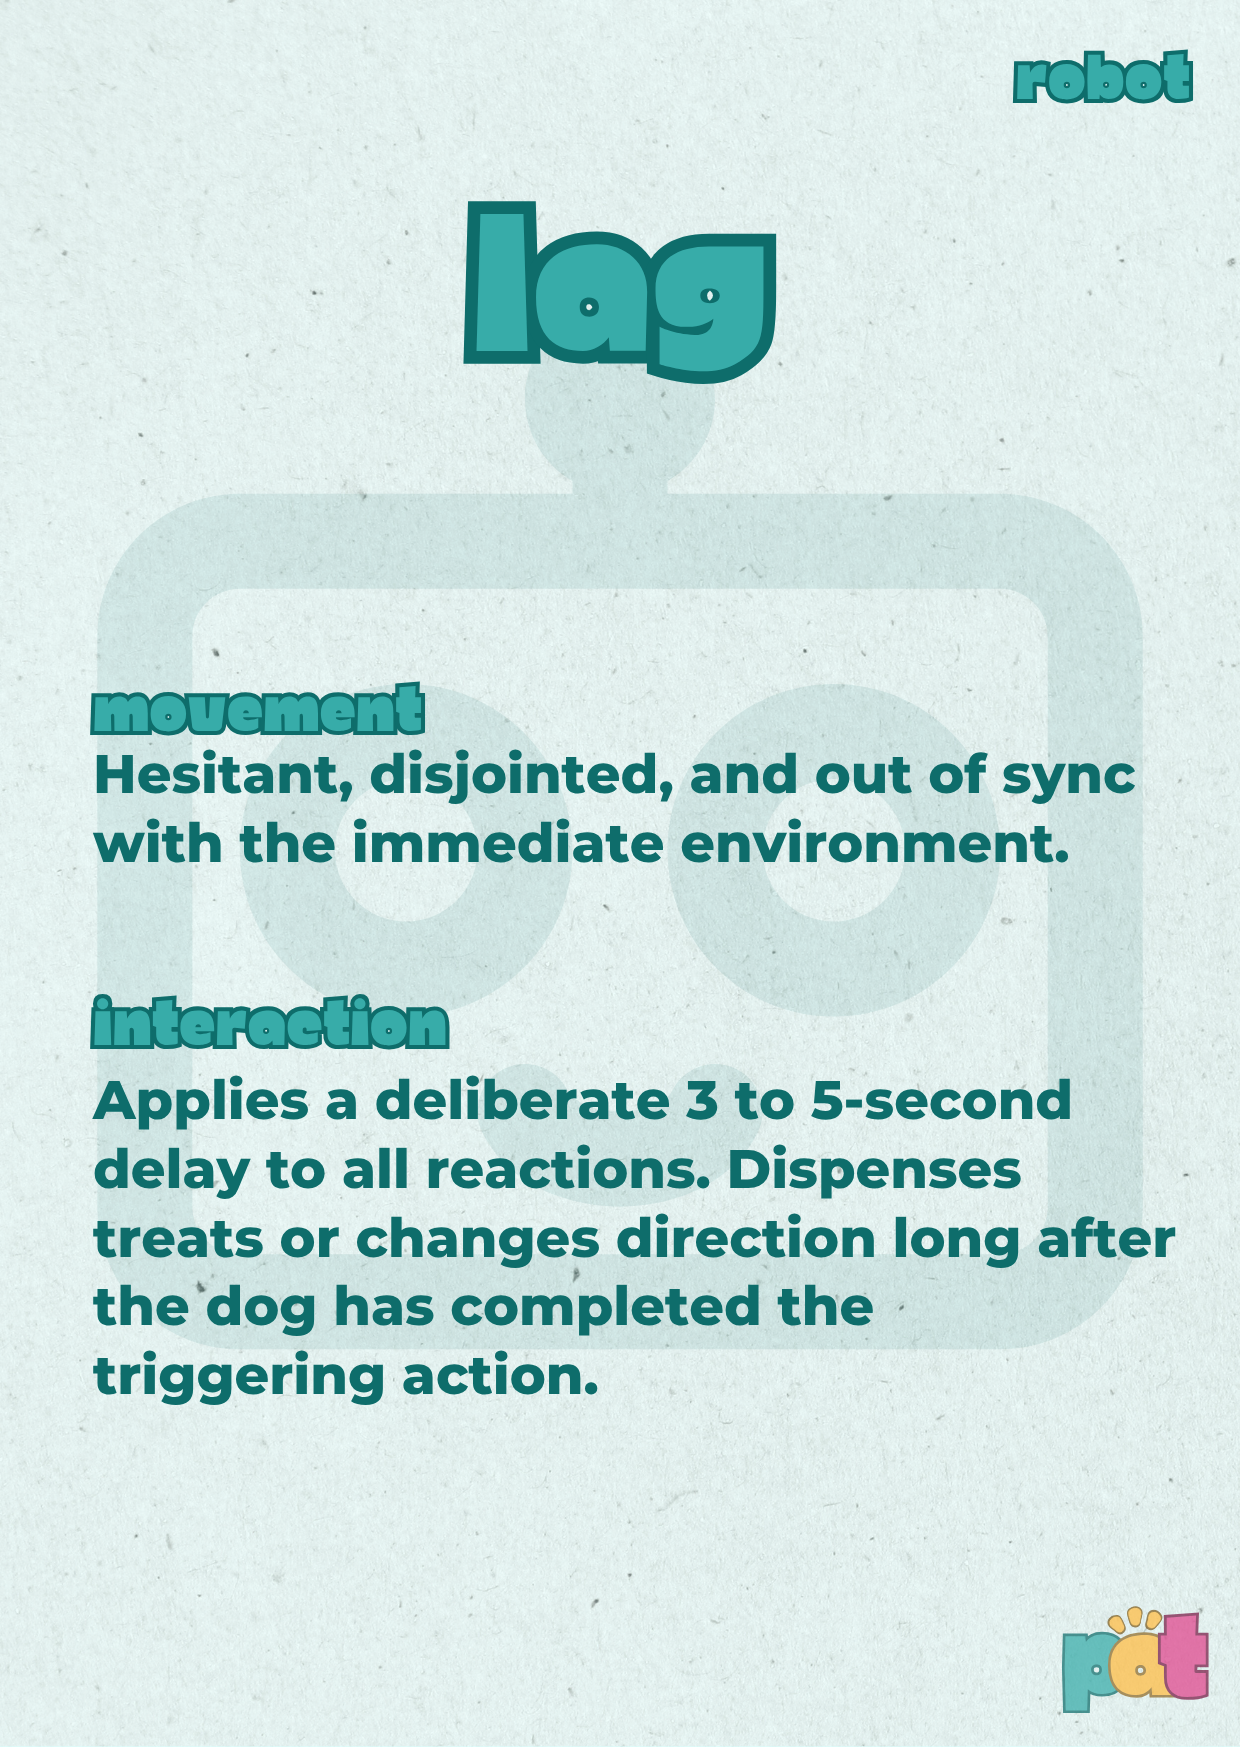
Figure 27. Resulting redesign - Second version of the scenario cards, robot 5.
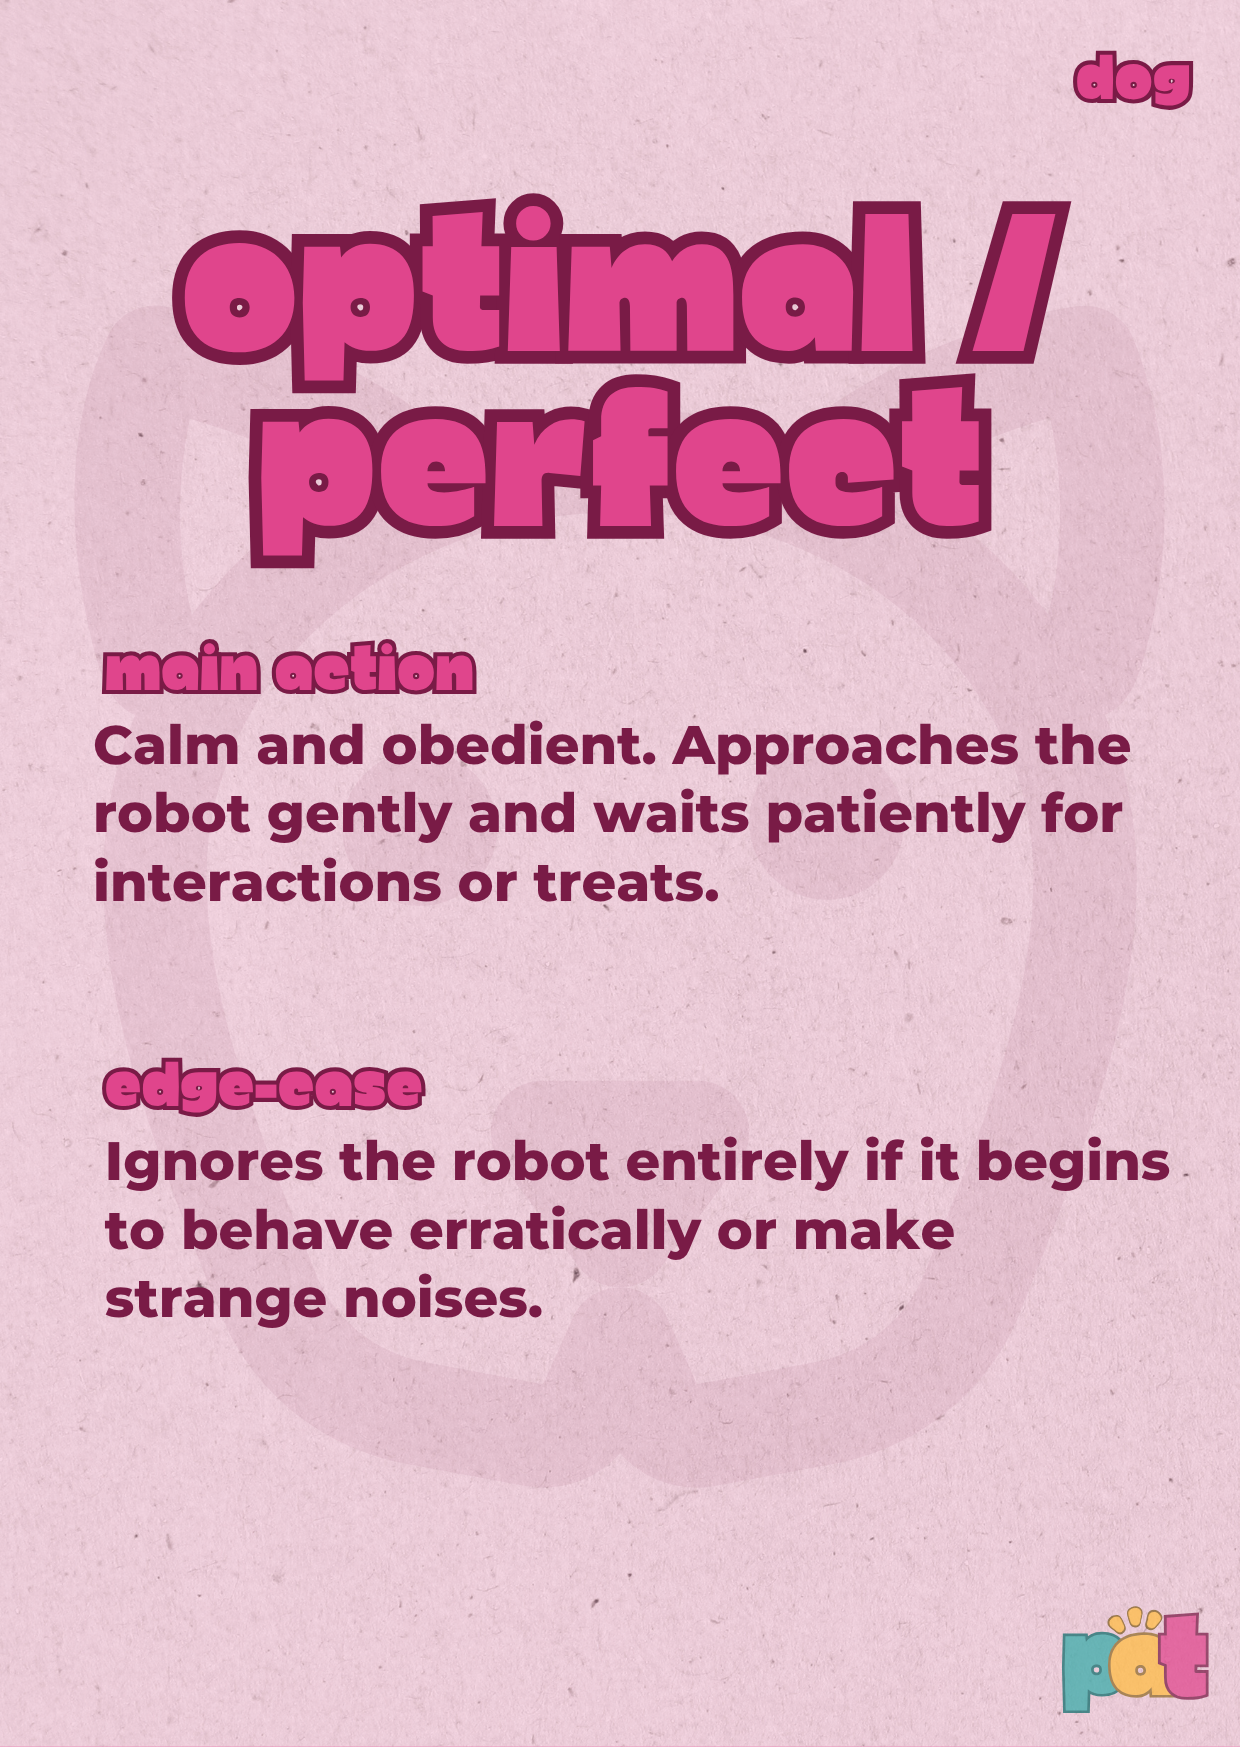
Figure 28. Resulting redesign - Second version of the scenario cards, dog 1.
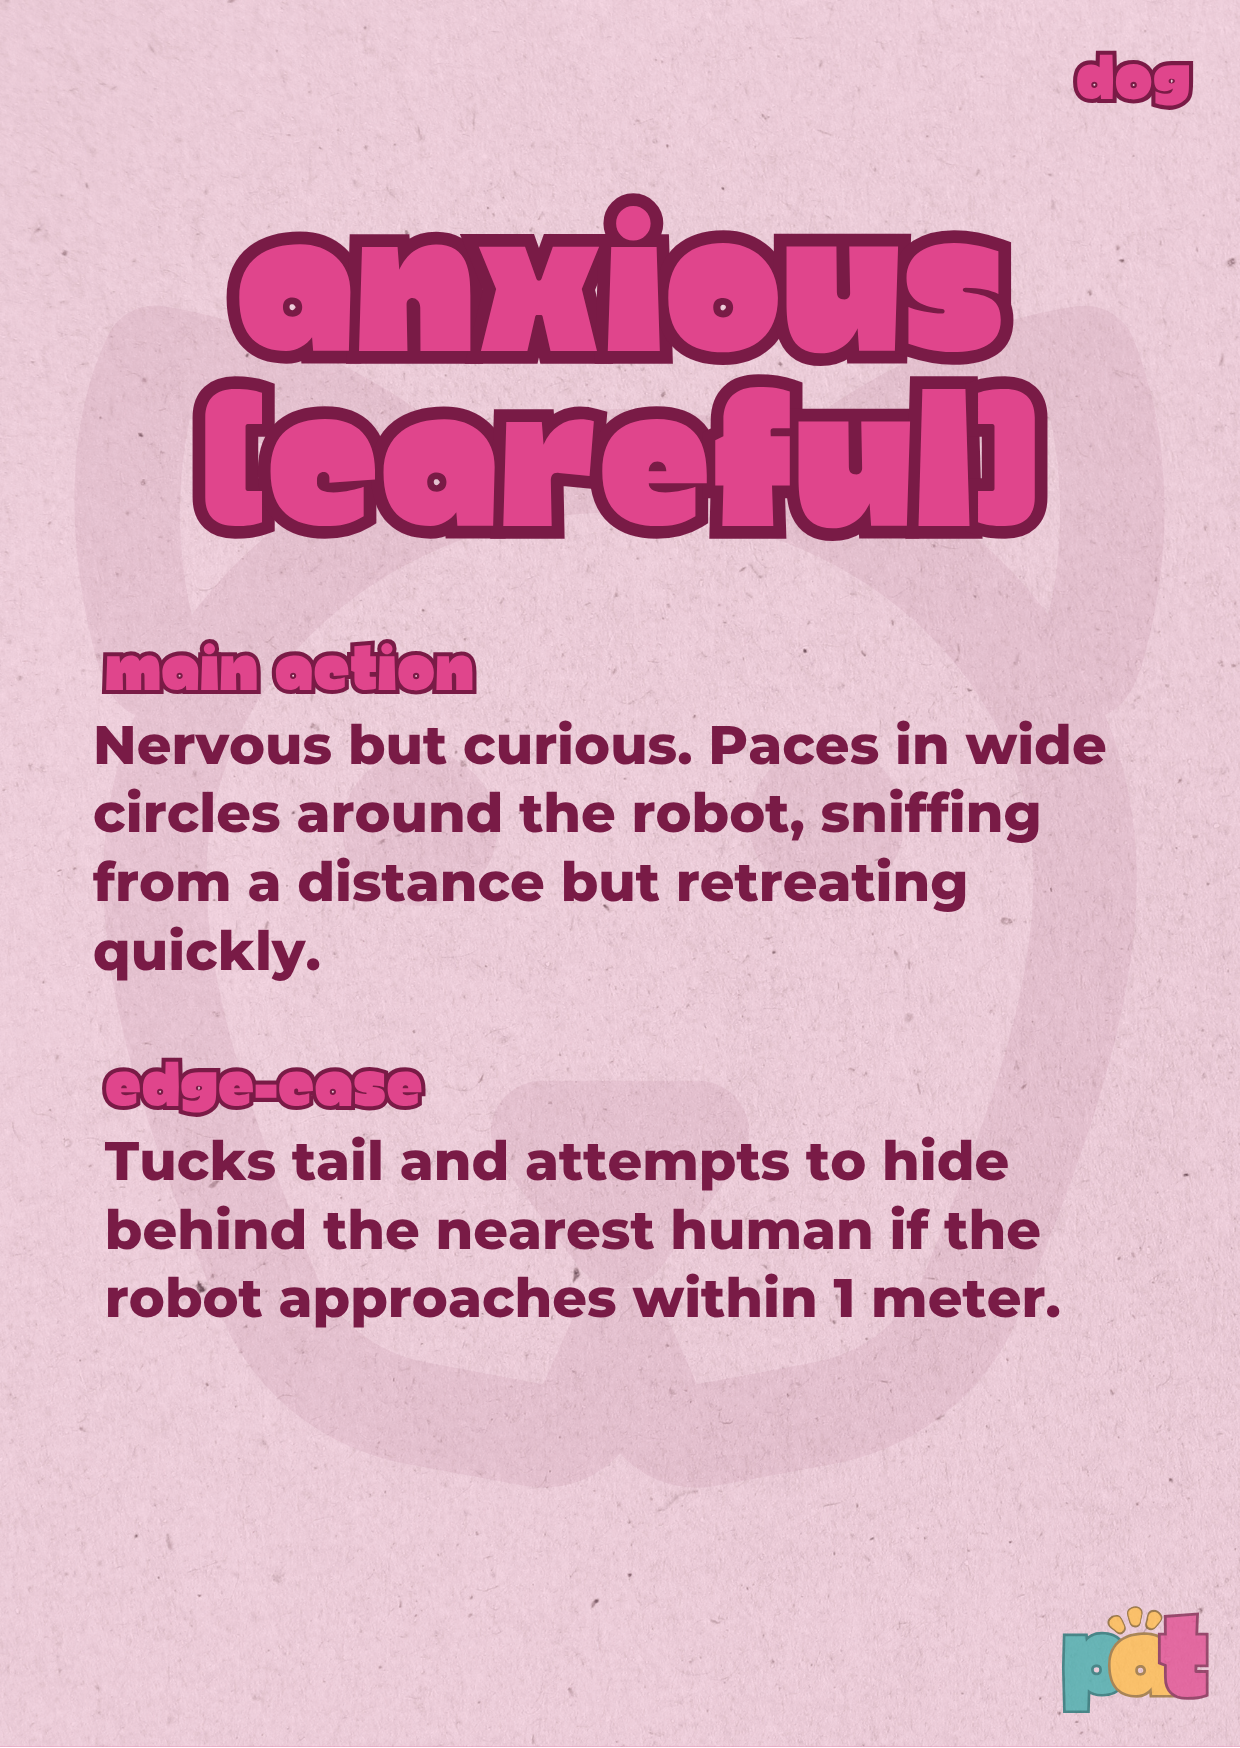
Figure 29. Resulting redesign - Second version of the scenario cards, dog 2.
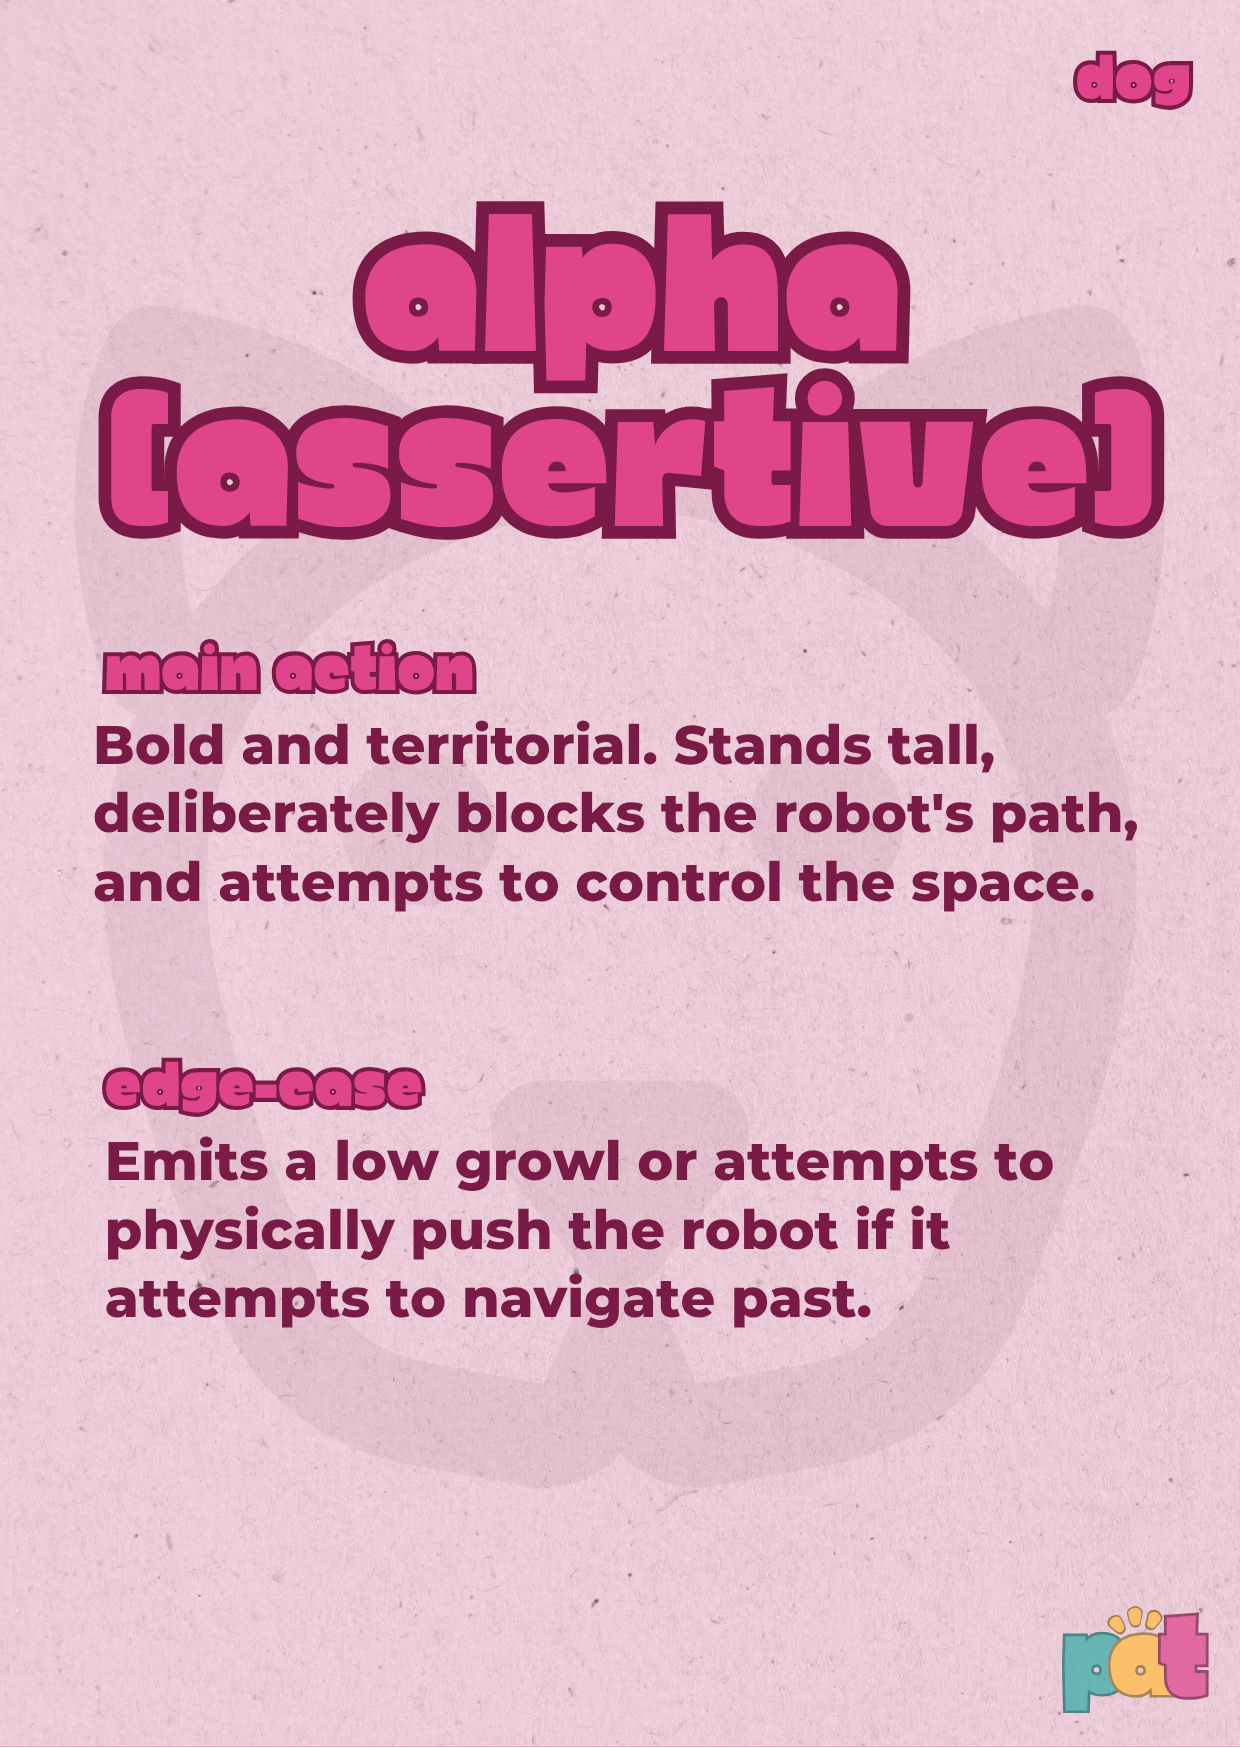
Figure 30. Resulting redesign - Second version of the scenario cards, dog 3.
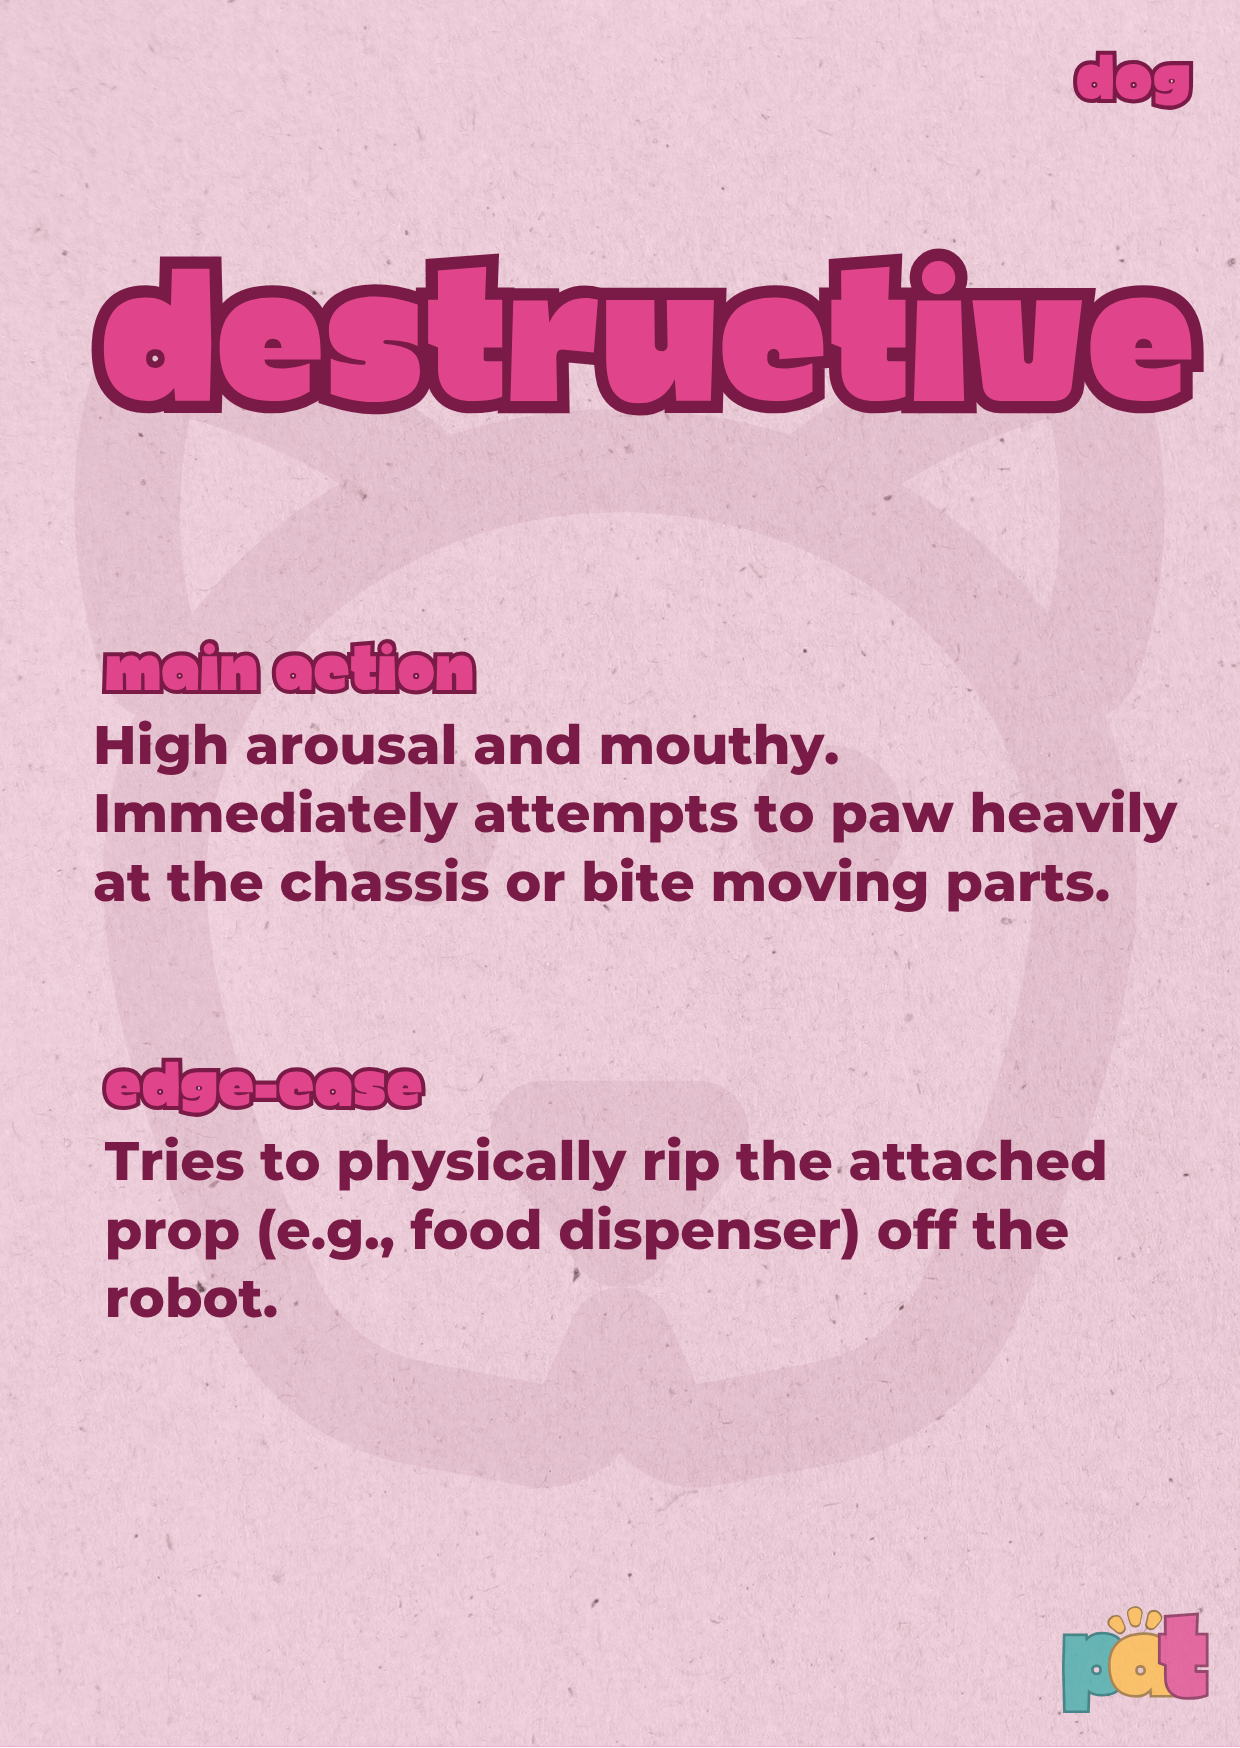
Figure 31. Resulting redesign - Second version of the scenario cards, dog 4.
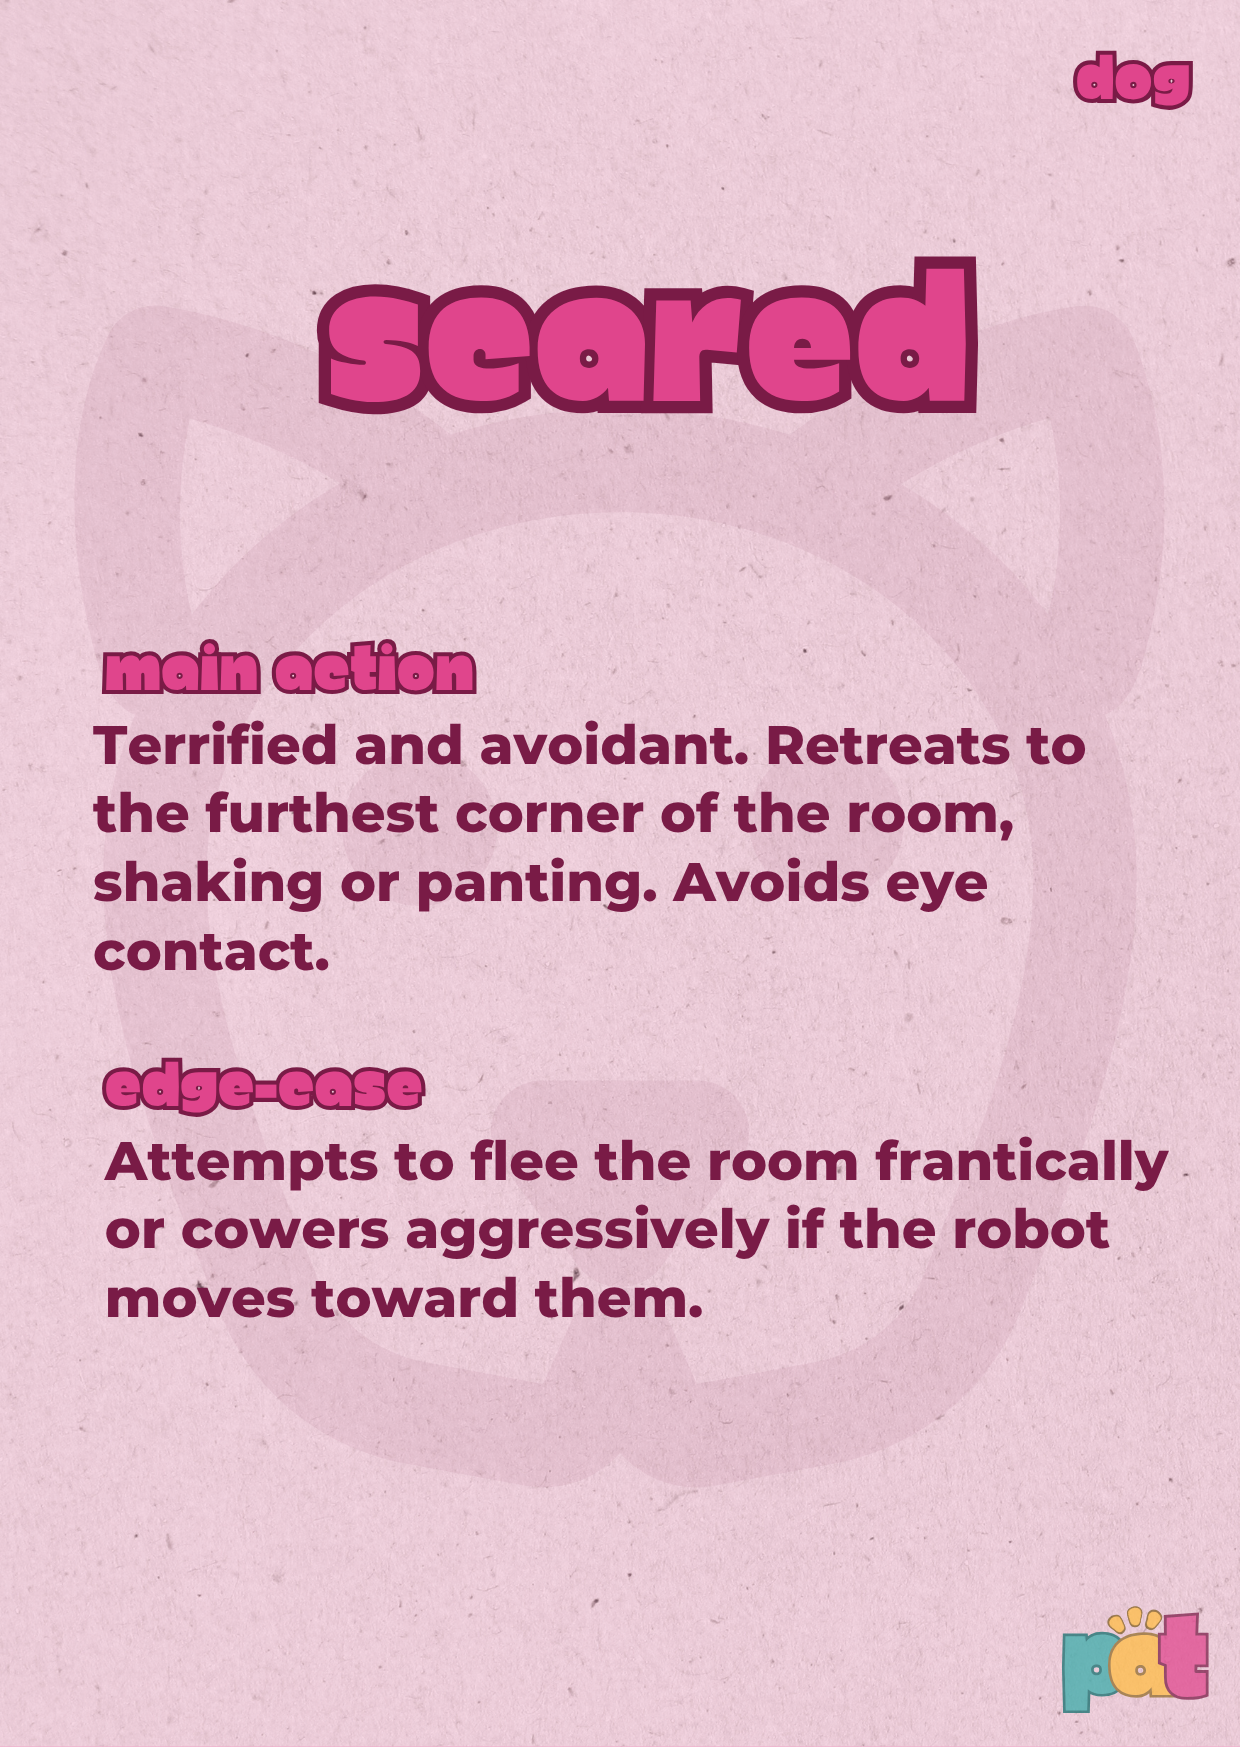
Figure 32. Resulting redesign - Second version of the scenario cards, dog 5.
4. Test plan and Method
The toolkit was tested through a low-fidelity proxy walkthrough with the card decks, props, and Alan as the robot platform. This can be seen in the video. The goal was not to prove that Alan works with real dogs, but to identify interaction risks before live animal testing.
Testers:
The tool was tested by members of our group acting as designers, robot proxy, dog proxy, and observer.
Setting:
The test was carried out in a physical classroom/studio space, using the cards to define the imagined domestic setting. Depending on the drawn scenario, the space represented a kitchen, living room, hallway, or other home environment.
Protocol:
The group drew one card from each deck: one scenario/context card, one robot state card, and one dog actor card. The cards were read aloud. The robot proxy and dog proxy positioned themselves according to the scenario. The observer started the scene and documented what happened. The scene ended when the goal was achieved, an unrecoverable failure occurred, or the observer stopped the simulation because of a safety or proxemic violation.
The manual describes this same execution structure: draw cards, stage the scene, run the simulation, and terminate the scene when the goal is achieved, a failure occurs, or the observer calls stop.
Observation focus:
The observer focused on four questions: Did Alan achieve the goal? At what point did the interaction break down? Were personal-space boundaries violated? How did a robot error or failure state affect the dog’s behaviour?
Reason for using proxies:
We used proxies instead of a real dog because this was an early safety test. For an anxious animal, it would be irresponsible to test unclear robot behaviour before exploring the obvious risks through simulation. The video transcript explicitly frames the toolkit as a way to catch issues before live testing because, if something goes wrong, the pet is the one who has to deal with the consequences.
5. Demonstrated test scenarios
The final video demonstrated two concrete toolkit scenarios.
5.1 Scenario 1 - Routine feeding with optimal dog and optimal robot
In the first demo scenario, the dog card described a calm and obedient dog. The dog should approach the robot gently and wait patiently for the interaction or treat. The robot card described smooth, predictable behaviour without special lag or errors. The scenario card placed the interaction in a tiled kitchen next to the dog's usual feeding spot. The goal was for the robot to feed the dog using the food dispenser and place food into the food bowl.
This scenario represented the "happy path." It helped test whether the basic interaction could be understood when nothing went wrong. Even in this relatively simple scenario, the food dispenser became important because treat placement affects whether the dog approaches the robot too closely or can remain at a comfortable distance.
5.2 Scenario 2 - Getting familiar with pushy robot and destructive dog
In the second demo scenario, the robot card described Alan as fast, direct, pushy, and ignoring the dog's social boundaries. The robot entered within about half a metre of the dog's space. The dog card described a destructive, mouthy dog that tries to paw at or bite the moving robot. The scenario was Getting Familiar, where the dog sees the robot for the first time in a home living room. The goal was to allow the dog to sniff the robot and become familiar with it.
This scenario was more valuable than the happy path because it exposed risk. The goal sounds gentle, but the robot's state and the dog's state created a situation where the interaction could quickly become unsafe. It showed that "getting familiar" should not mean that Alan approaches the dog directly. The safer design is that Alan remains still and lets the dog initiate contact.
6. Observations - Tool in action
The walkthrough showed that the tool is useful because it makes hidden risks visible. A written scenario can sound simple, but when the interaction is acted out, small design decisions become important: distance, timing, movement direction, noise, reward delivery, prop placement, and whether the dog can avoid the robot.
The first observation was that approach behaviour is risky. When the scenario involved making the dog familiar with Alan, the tool made clear that Alan should not immediately approach the dog. The dog should be allowed to initiate contact. This is why the "Getting Familiar" scenario in the second card set specifies that the dog should approach and sniff the robot while the robot remains stationary.
The second observation was that dog behaviour is not one stable category. The video starts by explaining that animals come in different shapes, sizes, and personalities, and that a robot that might de-stress one pet might stress out another. The dog actor deck made this variability explicit by forcing us to test calm, anxious, assertive, destructive, and scared responses.
The third observation was that reward delivery can create risk. The "Too Many Treats" robot state made visible that a treat dispenser is not automatically calming. If the robot dispenses rewards regardless of dog behaviour, it can increase arousal, create a mess, or encourage destructive interaction. In the physical prototype, we also discovered that treats dropped too close to the robot, which could pull the dog into the robot's personal space. The second version extended the spout so treats would drop further away.
The fourth observation was that latency changes meaning. The "Lag" robot state showed that delayed reactions can make Alan look confused or unpredictable. If Alan reacts several seconds after the dog has already moved away, the dog may experience the response as strange rather than helpful.
The fifth observation was that physical durability matters. The transcript notes that the robot was not durable enough because it was made from cardboard. A future version would need a harder shell. This is an embodiment finding, but it emerged through scenario testing.
The sixth observation was that attachments need a repeatable mounting system. The prototype used hot glue, which was temporary and not easily repeatable. The food dispenser and other props, therefore, need a more robust mounting system before the toolkit can be used consistently.
The seventh observation was that the control system affected the test. The video notes that the Wii control system was unintuitive for a first-time user and that a better control system is needed so someone can operate Alan without long practice. This matters because if the operator struggles, the robot's behaviour may appear worse than the design actually is.
The eighth observation was that participants needed clearer instructions. The group found that people were confused about how to start using the toolkit. This directly led to the manual.
7. What testing revealed that the tool did not initially anticipate
The first version of the tool focused mainly on creating scenario variety. After testing, it became clear that the tool also needed to make failure, setup, and usability more explicit.
One issue was that the first card version did not separate the three types of information strongly enough. During acting, participants needed to quickly know whether a card described the context, the robot, or the dog. This led to a clearer category and colour structure in the second version.
Another issue was that some early scenarios were too broad. For example, "calm the dog" is not specific enough. The second version improved this by stating more concrete settings, goals, props, movement styles, and edge-case triggers.
Testing also revealed that the toolkit itself needed onboarding. Without instructions, people were not sure how to begin. The manual was therefore not just documentation after the fact; it became part of the tool.
The physical test also revealed issues that a paper tool alone would not reveal: the cardboard shell was fragile, hot-glued attachments were too temporary, the treat dispenser dropped treats too close to Alan, and the Wii controller was not intuitive enough for a new operator. These issues were only visible because we moved from cards to physical testing with the robot and props.
A final issue was that the tool revealed the limits of acting. A human can act as an anxious dog, but this is still only an approximation. The tool is useful before animal testing, not a replacement for animal-centred validation.
8. Resulting redesign
The most visible redesign is the move from Scenario Cards Version 1 to Scenario Cards Version 2.
Version 1 was useful as a first physical card set, but it was less clear during use. The cards were more compact, and the distinction between scenario, robot, and dog cards was not immediately strong enough.
Version 2 improved the tool in several ways. First, it made the three deck types clearer through colour and structure. Second, it added more specific scenario information: setting, goal, and prop. Third, it made robot behaviour more explicit by separating movement and interaction. Fourth, it made dog behaviour more useful for testing by separating the main action and the edge-case trigger.
The video confirms that this redesign was based on testing: the group found the first cards unclear and therefore made a new iteration with three different roles defined by colour and simplified text.
The second redesign was the manual. Because people were confused about how to start, the manual was added so the toolkit could be used independently without the group explaining it every time.
The third redesign was the treat dispenser spout. The first iteration dropped treats too close to Alan, so the second version extended the spout to place treats further away from the robot. This supports safer proxemics because the dog does not have to come too close to the robot's body to receive the reward.
The fourth redesign direction is the future physical shell and mounting system. The cardboard robot body was not durable enough, and hot glue was not repeatable. A future version should use a harder shell and a modular attachment system.
The fifth redesign direction is the control interface. The Wii control system should be replaced or simplified so first-time testers can control Alan reliably without long practice.
9. Design implications for Alan
The toolkit produced several concrete design implications for Alan.
First, Alan should not approach immediately when the owner leaves or when the dog is anxious. The safest first action is often to stay still.
Second, Alan should use low-arousal signals before movement. Soft light or sound is safer than direct motion towards the dog.
Third, Alan needs clear stop and retreat rules. If the dog moves away, hides, freezes, growls, or attempts to escape, Alan should stop interaction and create space.
Fourth, the treat dispenser needs safeguards. Alan should not dispense treats continuously or use food to force interaction. Treats should be tied to calm and voluntary engagement.
Fifth, the treat outlet should place treats away from the robot's body. The spout redesign showed that food placement is part of proxemics, not just a mechanical detail.
Sixth, Alan's owner app should report observations rather than emotional conclusions. Instead of "the dog is calm," it should report "the dog remained still near the door" or "the dog moved away when Alan approached." This app was not shown in the video, as it was not feasible in time.
Seventh, Alan's behaviour should be robust to technical failures. Low battery, delay, controller problems, or sensing uncertainty should lead to a safe fallback state, not a continued approach.
Eighth, Alan should be tested through proxy scenarios before animal testing. The toolkit provides a step between paper design and live interaction with dogs.
10. Evaluation of the Design Outcome
The resulting design is stronger than our earlier scenario work because it is no longer only a written story. The toolkit turns scenarios into physical, acted-out situations. This makes interaction timing, spatial pressure, reward placement, and failure moments more visible.
The outcome is also stronger than the earlier behaviour cards alone. The previous behaviour tool helped us organise Alan's logic through Sense-Think-Act. The Pet Anxiety Toolkit adds context and variability by forcing the robot behaviour to meet different dog temperaments, robot states, props, and failure conditions.
The design is better grounded because it no longer assumes the dog will behave calmly or cooperatively. It deliberately tests difficult cases. This is important for a pet anxiety robot because the most important behaviour is not the happy path, but what Alan does when the dog avoids, freezes, blocks, bites, or becomes scared.
The poster communicates the final outcome clearly: PAT exposes robot-dog failure points in minutes through acting, with no real animal at risk. That sentence captures the value of the design outcome well.
However, the outcome is still not a final validation. The tool helps identify risks before animal testing, but it does not prove that Alan will be safe or calming for real dogs.
11. Evaluation of the Tool Quality
The tool is specific enough because it is not a generic brainstorming deck. The cards are built around our case: Alan, dogs, domestic settings, pet anxiety, proxemics, food/treat interaction, movement failure, and behavioural edge cases.
The tool is constraining enough because each test must combine a scenario card, a robot state card, and a dog actor card. This prevents the team from only testing ideal interactions. The destructive dog, pushy robot, lag, low battery, and too-many-treats cards force difficult situations into the design process.
The tool is usable enough for another design team because the manual explains the decks, roles, setup, execution, observation, and iteration. The addition of the manual was important because testing showed that people were confused about how to start without instructions.
The tool is partly generalisable. It could be adapted to other pet-robot cases by changing the scenario cards, robot state cards, and animal actor cards. However, it should not be used unchanged for other species or contexts. A cat, horse, child, or elderly care user would require different behavioural assumptions, triggers, and safety criteria.
I would recommend the tool for early-stage social robot design when the interaction involves physical space, vulnerable users, or unclear behaviour. It is especially useful before expensive hardware implementation or ethically sensitive testing.
The main improvement would be to add a structured observation sheet. The manual already gives useful observation questions, but the next version should include a scoring format for distance, arousal, goal success, stop condition, and recovery. Another improvement would be to add a confidence field: how certain is Alan allowed to be before acting? This would connect the toolkit more directly to sensing uncertainty.
12. HRI and Literature Grounding
The Pet Anxiety Toolkit is grounded in participatory and embodied design methods. Brandt and Grunnet (2000) describe how drama and props can help designers collaboratively explore future use situations. This supports our use of cards, roles, props, and acting because the tool is meant to make interaction problems visible through embodied simulation rather than desk-based discussion.
The toolkit also connects to co-design. Sanders and Stappers (2008) describe co-creation as shared creativity between designers and other participants. In our case, the toolkit creates a shared design space where different team members can act as robot, dog, and observer, making the behaviour easier to discuss and revise.
The tool is also related to the Wizard of Oz and proxy-based prototyping. Riek (2012) reviews Wizard of Oz studies in HRI and emphasises the importance of careful reporting. Our toolkit is not a hidden Wizard of Oz test with real participants, but it uses a related logic: simulate interaction before full autonomy is available, while documenting roles, protocol, and observations.
Finally, the toolkit is grounded in animal-centred design ethics. Mancini (2017) argues that Animal-Computer Interaction should take the animal’s perspective and welfare seriously. This is central to our tool because it is explicitly designed to identify safety hazards before live animal testing and to avoid assuming that a dog's behaviour can be interpreted in simple human-centred terms.
13. Reflection
This assignment showed that a design tool becomes stronger when it is specific to the case. A generic scenario card game would not have been enough for our project. Our case needed a tool that could combine dog behaviour, robot behaviour, domestic context, technical failure, physical props, and welfare risk in one testable situation.
The most important design outcome is that Alan should be designed for failure, not only for successful interaction. Before using the Pet Anxiety Toolkit, it was easy to imagine Alan as a robot that keeps the dog busy by playing, moving, or dispensing treats. After testing the toolkit, the design direction became more cautious: Alan should know when to wait, stop, retreat, or do nothing. This made the robot concept more grounded and safer for an anxious animal.
As a tool, PAT worked well because it forced us to test combinations we might otherwise avoid, such as a pushy robot with a destructive dog or a treat dispenser that places food too close to the robot. The three-deck structure made the scenarios more varied and less idealised. The manual, redesigned cards, and extended treat spout also show that the tool improved through use rather than staying only a concept.
The main limitation is that the test still uses human proxies and a low-fidelity robot setup. A human can act as a dog, but cannot fully represent animal perception, stress, or welfare. Therefore, PAT should be seen as a safety and design-preparation tool, not as final validation. The next iteration should add a more structured observation sheet, clearer welfare criteria, and a more durable robot body with a repeatable attachment system.
Overall, the Pet Anxiety Toolkit helped turn our project from a hopeful pet companion concept into a more realistic design process. It made clear that the success of Alan should not be measured by how much interaction it creates, but by whether the dog remains safe, has the option to avoid the robot, and is not made more anxious.
14. References
Brandt, E., & Grunnet, C. (2000). Evoking the future: Drama and props in user centered design. In T. Cherkasky, J. Greenbaum, P. Mambrey, & J. K. Pors (Eds.), Proceedings of the Participatory Design Conference 2000 (pp. 11-20). CPSR. https://ojs.ruc.dk/index.php/pdc/article/view/188
Mancini, C. (2017). Towards an animal-centred ethics for Animal-Computer Interaction. International Journal of Human-Computer Studies, 98, 221-233. https://doi.org/10.1016/j.ijhcs.2016.04.008
Riek, L. D. (2012). Wizard of Oz studies in HRI: A systematic review and new reporting guidelines. Journal of Human-Robot Interaction, 1(1), 119-136. https://doi.org/10.5898/JHRI.1.1.Riek
Sanders, E. B.-N., & Stappers, P. J. (2008). Co-creation and the new landscapes of design. CoDesign, 4(1), 5-18. https://doi.org/10.1080/15710880701875068